|
|
|
|
 Drionic uses a proprietary 9-volt dry cell battery ("LG" cell) which resembles a J-type battery used in many
pagers, but J-cells are 6-volts and are about two-thirds the size. The LG cells are not available for purchase anywhere except from the
manufacturer of Drionic, General Medical Co. They are pricy in the long-run ($7.00 for a pair, with a minimum $12.00 purchase plus
$5.00 shipping in the U.S.) and have a finite lifespan (the manufacturer estimates about 6-7 hours). Some Drionic users have
modified their units to use standard alkaline 9-volt batteries which are readily available, but there is still the need to replace
them from time to time.
Drionic uses a proprietary 9-volt dry cell battery ("LG" cell) which resembles a J-type battery used in many
pagers, but J-cells are 6-volts and are about two-thirds the size. The LG cells are not available for purchase anywhere except from the
manufacturer of Drionic, General Medical Co. They are pricy in the long-run ($7.00 for a pair, with a minimum $12.00 purchase plus
$5.00 shipping in the U.S.) and have a finite lifespan (the manufacturer estimates about 6-7 hours). Some Drionic users have
modified their units to use standard alkaline 9-volt batteries which are readily available, but there is still the need to replace
them from time to time.
For the cost of replacement batteries (and a little bit of time to do the one-time modification), I have adapted my Drionic units to use power supplied from a pair of 9 VDC, 300-500 mA AC-to-DC transformers. The modification does not render the "LG" batteries unusable, so you can still use batteries (e.g., for when you travel), or "over-ride" them when the transformers are plugged in.
 Tools and Parts List
The first two items can be purchased at most electronics/hobbyist stores. For the transformer, buy the lowest current rating you
can find (typically about 300 mA) as these are typically lower-priced. The available current doesn't really matter (the Drionic
device only draws about 20-30 mA, so anything over is simply not consumed). I personally used 500 mA transformers because I
couldn't find anything lower at the time. I purchased them from a company in Calgary, Canada, called
MRO Electronics: the transformers were CA$7.20/ea, or ~US$4.80/ea (PN 68-950-1), and the
jacks were $1.15/ea, or ~US$0.77/ea (PN 31-134-1). |
  1. A hole for mounting the jack (in my case, 1/2" diam.) has been drilled into both Drionic devices as shown.
I didn't have a 1/2" drill bit, so I drilled a smaller hole and widened it using a Dremel tool.
1. A hole for mounting the jack (in my case, 1/2" diam.) has been drilled into both Drionic devices as shown.
I didn't have a 1/2" drill bit, so I drilled a smaller hole and widened it using a Dremel tool.
|
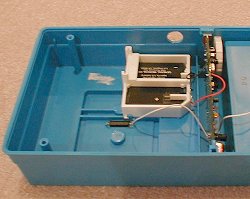  2. This is a view of the holes when the Drionic units are turned upside-down with the cover removed.
|
  3. The 2.1 mm DC power jack is now mounted, with bottom view of one unit, and front view of the other. The
nut which holds the jack in place is tightened to secure it in place.
3. The 2.1 mm DC power jack is now mounted, with bottom view of one unit, and front view of the other. The
nut which holds the jack in place is tightened to secure it in place.
|
 4. It is difficult to describe the power jack in layman's terms, but if you can read a schematic diagram,
this figure illustrates (A) the Drionic unit prior to modification (jack is separate), (B) the modified
Drionic with the jack wired in (notice the battery can still provide current to the Drionic circuit board,
and (C) the unit with the external DC adapter plugged in to provide power (cutting off and conserving
battery-supplied power). Determining which of the three terminals is which on the power jack might be a
bit tricky unless you have a continuity tester or multi-meter. The center post is easily identified by
its central placement (and slightly larger rivet) on the wafer which the three terminals are mounted. If
you have a continuity tester, simply plug the external DC adapter into the jack (without plugging adapter
into a power source) and test for continuity between the terminal and the outside barrel of the adapter.
4. It is difficult to describe the power jack in layman's terms, but if you can read a schematic diagram,
this figure illustrates (A) the Drionic unit prior to modification (jack is separate), (B) the modified
Drionic with the jack wired in (notice the battery can still provide current to the Drionic circuit board,
and (C) the unit with the external DC adapter plugged in to provide power (cutting off and conserving
battery-supplied power). Determining which of the three terminals is which on the power jack might be a
bit tricky unless you have a continuity tester or multi-meter. The center post is easily identified by
its central placement (and slightly larger rivet) on the wafer which the three terminals are mounted. If
you have a continuity tester, simply plug the external DC adapter into the jack (without plugging adapter
into a power source) and test for continuity between the terminal and the outside barrel of the adapter.
|
 5. Here I've identified the red wire from the battery to the circuit board, and de-soldered it at the circuit
board end (taking note of where it was). I then soldered this wire to a terminal on the jack (per diagram in
#4 above). If you don't have a soldering iron available, another way is to snip the red wire about halfway
between the circuit board and the battery, and then stripping about 1/4" at the end of the plastic sheath.
You can then splice a wire to extend the wire from the battery, and tie it to a terminal on the jack.
5. Here I've identified the red wire from the battery to the circuit board, and de-soldered it at the circuit
board end (taking note of where it was). I then soldered this wire to a terminal on the jack (per diagram in
#4 above). If you don't have a soldering iron available, another way is to snip the red wire about halfway
between the circuit board and the battery, and then stripping about 1/4" at the end of the plastic sheath.
You can then splice a wire to extend the wire from the battery, and tie it to a terminal on the jack.
|
  6. Next, I soldered a new red wire to the circuit board (where the former red wire was) at one end, and the
other end was soldered onto the other terminal of the jack. Again, you can splice a new wire onto the end
of the cut wire (hanging off the circuit board) and extend it to the power jack.
6. Next, I soldered a new red wire to the circuit board (where the former red wire was) at one end, and the
other end was soldered onto the other terminal of the jack. Again, you can splice a new wire onto the end
of the cut wire (hanging off the circuit board) and extend it to the power jack.
|
  7. Finally, I soldered a new black wire between the center terminal of the jack and the negative terminal of
either the battery or the circuit board (I've wired it up to the circuit board).
7. Finally, I soldered a new black wire between the center terminal of the jack and the negative terminal of
either the battery or the circuit board (I've wired it up to the circuit board).
|
|
8. Test your unit out: Without any adapter plugged into the Drionic device, the battery (assuming it's not dead) should provide power to the unit (green LED illuminated). When the AC/DC adapter is plugged into the Drionic unit (but NOT into an AC outlet), the green LED should go out. Once the adapter is plugged into an electrical outlet, the LED should again illuminate, indicating it is getting external power. |
|
|
 The modification required the purchase of the following: