Hello! Welcome to Heartland Helping Hands tutorial for making globes. Here you will learn how easy it is to make globes! Paint Shop Pro is the program of choice for this tut. If you've got PSP, a little bit of time and the interest, get ready to make your first globe! They are lots of fun to make and can be habit forming. *smile* I am Marcia and if you have any questions after you have gone through this tutorial, please email me and I will try to help.
If you don't have a globe tube, the first thing you'll want to do is download a zip file, unzip and install it into your PSP Tubes file. You can do that here.Next, you'll want to copy this image to your hard drive to use in the globe.
 Now you are ready to start so you need to open a new image. A good size is 300x300 pixels. You need to be very sure that you set the background color as transparent. Now you are ready to start so you need to open a new image. A good size is 300x300 pixels. You need to be very sure that you set the background color as transparent.
|
 Now you will choose the selection tool on your tool bar, then choose elipse or circle on your tool options settings. Make sure the antialias box is checked for the smoothest edges. Then you will make a circle with your selection tool. You will see what is called "marching ants" in a circular shape. Make sure that the size you make your circle leaves enough room for you to add a base later on. Now you will choose the selection tool on your tool bar, then choose elipse or circle on your tool options settings. Make sure the antialias box is checked for the smoothest edges. Then you will make a circle with your selection tool. You will see what is called "marching ants" in a circular shape. Make sure that the size you make your circle leaves enough room for you to add a base later on. |
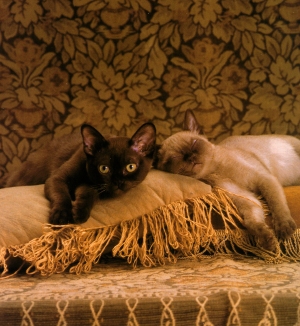
 It's now time to pick the image you would like to have in the globe. It's a good idea for the image you choose to be at least as large as your circle selection. I have chosen cats for this tut. *smile* Take your selection tool still on elipse or circle and select the area of the image, copy and then paste the image into the selection on your new image. It's now time to pick the image you would like to have in the globe. It's a good idea for the image you choose to be at least as large as your circle selection. I have chosen cats for this tut. *smile* Take your selection tool still on elipse or circle and select the area of the image, copy and then paste the image into the selection on your new image.
|
 You should now have something that looks like this. Before you go any further with this, you will go to Selections on your menu bar and click on select none. By doing this, the "marching ants" disappear. You should have a clean, smooth edge around your image. You should now have something that looks like this. Before you go any further with this, you will go to Selections on your menu bar and click on select none. By doing this, the "marching ants" disappear. You should have a clean, smooth edge around your image. |
 Now you're ready to add the globe. Before selecting the tube tool, go to your menu bar, click on Layers, then Add New Raster Layer. This is very important because by doing this, you will be able to resize your globe to fit your image exactly. Now choose your tube tool and find the globe tube. Now you're ready to add the globe. Before selecting the tube tool, go to your menu bar, click on Layers, then Add New Raster Layer. This is very important because by doing this, you will be able to resize your globe to fit your image exactly. Now choose your tube tool and find the globe tube. |
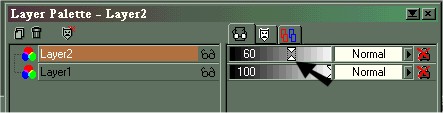
 More than likely, your globe tube is either larger than your image or smaller. Now you will need to go to your tool bar and choose the deformation tool. You should see a square on your globe with nodes one each side of the square. You will use the nodes to resize the globe to fit the image perfectly. The globe is probably not as transparent looking as you would like it, so you will go to your Layer Palette and fade that layer to about 60 or 50 percent. It depends on what you like. More than likely, your globe tube is either larger than your image or smaller. Now you will need to go to your tool bar and choose the deformation tool. You should see a square on your globe with nodes one each side of the square. You will use the nodes to resize the globe to fit the image perfectly. The globe is probably not as transparent looking as you would like it, so you will go to your Layer Palette and fade that layer to about 60 or 50 percent. It depends on what you like.
 |
When you're satisfied with the fit of your globe on your image,
you're now ready to add a base. Click on the "next" button. |


