Painted HorseOctober 2003
|
This tutorial is very different from what I've been doing. In this tutorial, we are going to paint a horse using the airbrush, retouch tool, paintbrush, draw tool, & gausian blur. This is a *very* intense tutorial & is intended for more advanced PSP users. I made a screen shot for almost every step I did to help you, so this page will take some time to load.
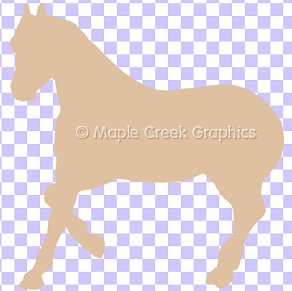
I have already done the hardest part for you & drew the basic outline of the horse. You may download my horse canvas here. The selection is saved to the Alpha Channel & you will load it from there. You're going to use this selection a LOT, so that's why I saved it to the AC.
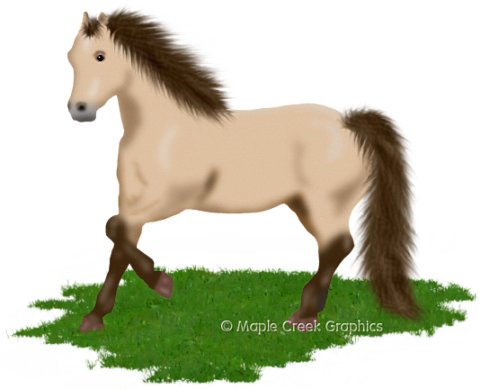
1 - Open the Horse Canvas in PSP & load the outline selection from the Alpha Channel. Flood fill with the color of your choice. I am making a buckskin horse, so I filled mine with #DEC1A2. Deselect.
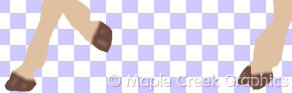
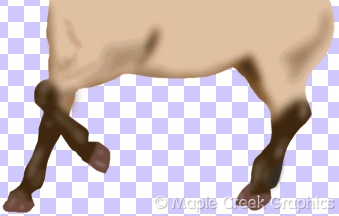
2 - Add a new layer (unless stated otherwise, we will be adding a new layer for each step - this is very important!). For the shading, I am starting from the bottom up, but feel free to do what works best for YOU! I started with the hooves & used the paintbrush & color #69463A to paint each one. It's okay if you go outside the lines. This is why I saved the outline selection to the AC! Just load the selection, invert & hit the delete key on your keyboard to get rid of the excess. I thought the edges of the tops of my hooves were too jagged, so I used the retouch tool to lightly soften the edges. Here is what I have:

Notice the back legs? They are merged together at this point, so be careful when shading them!
3 - Add a new layer. Using white (or the color of your choice), and your paintbrush at size 1, draw lines on each hoof. Then apply a Gaussian blur of 2. If it looks too strong to you, lower your layer opacity slider until you get the look you want (I lowered mine to about 60).
4 - Add a new layer. As I said before, colors & shading are totally up to you. If you are following along with me, use your airbrush tool & color #3D260D to shade the lower legs. Experiment with the settings on the airbrush until you like what you see. It doesn't really matter since we're going to blur it anyway. When you're finished adding color, add a Gaussian blur of 4. Reload the outline selection, invert, & delete the excess. If you accidentally overlap your hooves, just grab the hoof layers (there should be two) & drag them to the top of the canvas. Here is what I have so far:
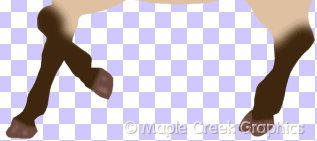
5 - Now we are going to add some highlights & shadows to the legs. I created a separate layer for each color & used various shades of dark browns (even black) for the shadows & light browns, creams & white for the highlights. Experiment with the blur settings also to get the look you want. Mine varied between 2 and 4. If your shading goes outside the outline, reload the outline selection, invert, & delete the excess. One of the benefits of placing each color on a different layer is that if you don't like it, you can just delete that layer & start all over without losing the rest of your image. Here are my results. I apologize that they look a little blurry due to compression :o(
6 - Now do the same for the body. Add a new layer each time you add another color. Apply a Gaussian blur to each layer. I varied my settings between 2 and 4. Don't forget to delete the excess! Here is what I have so far:

7 - Now do the same for the head. I pixel-painted my eye using black, white & a dark brown. I zoomed in really close & painted it one pixel at a time, then applied a Gaussian blur of 0.65.
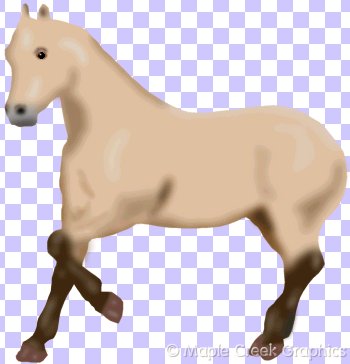
8 - Now is the time to add any last-minute shading or changes. When you're happy with your image, merge visible layers. Reload the outline selection from the Alpha Channel, invert, & hit the delete key on your keyboard (just in case there is any excess you may have missed earlier). I added noise 3% uniform just to smooth out my shading.
9 - Add a new layer. Use your paintbrush and color #3D260D to paint the basic outline for the mane & tail. It's okay if you have to increase your canvas size to make it fit - we won't be needing the Alpha Channel selection anymore. Use your smudge tool & mess 'em up a bit. Use the settings that you feel most comfortable with. Try experimenting with custom brushes. Remember that hair isn't perfect & if you're not happy with it, there's always "Undo" (*grin*).

That's it! Merge visible layers & export as a picture tube! Give yourself a HUGE pat on the back, too! This was a hard one!
~Home~
Graphics, web design, & content © 2003 Jennifer Chappell. All rights reserved.
The graphics and content of this site may not be duplicated, electronically or otherwise, without the author's permission.
|
|
|