
Lab PuppyNovember 2003
|
This is my newest PSP passion (obsession, LOL) - pixel painting. It is very easy to do, but it can take up a lot of time and patience. This tutorial has more screen shots than usual and they are also larger than usual, so please allow time for the page to load. I have provided images to show the number & placement of each pixel & I marked the length of segments that are longer than 2 pixels.
For this tutorial, you will need:
Jasc Paint Shop Pro - Get a 30-day free trial here. (Note: This tutorial was made using PSP 8, but it may be possible to do it using other versions.)
Feedback is always appreciated. If you are having a problem with this tutorial, please e-mail me for assistance.
1 - Open a new image in PSP approximately 215 X 175 pixels, 16 million colors, transparent background. I flood filled my first layer with white to help me see what I was doing. If you do this, don't forget to add a new raster layer before starting! We are going to add everything on the same layer. If you mess up, just go to Edit --> Undo or use your eraser tool.
2 - Activate your paintbrush tool & set it to size 1, step 1, and hardness, opacity, & density all set to 100. Change your foreground color to #E9C293 and draw the following shape on your canvas. Use black to draw the outline for the eyes & nose. There is a white pixel in the upper left corner of each pupil. The iris of the eye is outlined in #7D5721. It doesn't matter where you place it because we're doing everything on one layer, so if you run out of room just use your mover tool to move the object over. Draw the object using one pixel at a time. Zoom in if you need to.

3 - Use #E9C293 to draw the outline of the body. I broke it up into two separate pictures. The black likes separate what you should have already drawn.
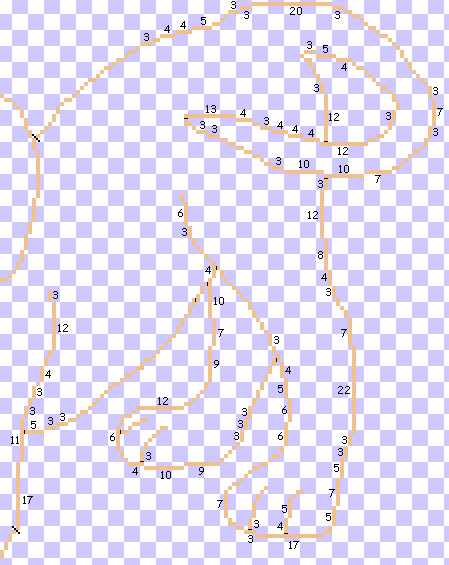
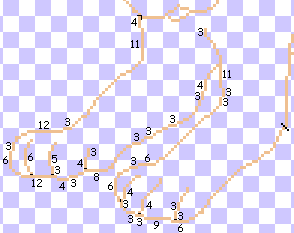
4 - Use the Magic Wand tool & click inside the body, back leg, head & chin while holding down the Shift key on your keyboard. Flood fill with #F2E1CE. Go to Selections --> Float, then apply a cutout with Vertical & Horizontal offsets both at 0, Opacity 100, blur 15, and color #E9C293. Deselect.
5 - Use the Magic Wand tool & click inside the outer areas of the eyes while holding down the Shift key on your keyboard. Flood fill with white. Go to Selections --> Float, then apply a cutout with the same settings, but change the blur to 5 and color to #C0C0C0. Deselect.
6 - Use the Magic Wand tool & click inside the inner ares of the eyes while holding down the Shift key on your keyboard. Flood fill with #A97F43. Go to Selections --> Float, then apply a cutout with the same settings as above, but change the color to #7D5721. Deselect.
7 - Use the Magic Wand tool & click inside the nose. Flood fill with #808080. Go to Selections --> Float, then apply a cutout using the same settings as above but change the color to black. I added a few white pixels just to give the nose some "shine". Deselect.
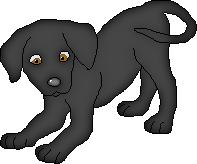
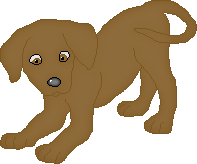
That's it! Your finished! I had so much fun with this one, I had to make a black & a chocolate (YUM...Chocolate!).
~Home~
Graphics, web design, & content © 2003 Jennifer Chappell. All rights reserved.
The graphics and content of this site may not be duplicated, electronically or otherwise, without the author's permission.
|
|
|