
Christmas CatSeptember 2003
|
This is my newest PSP passion (obsession, LOL) - pixel painting. It is very easy to do, but it can take up a lot of time and patience. This tutorial has more screen shots than usual and they are also larger than usual, so please allow time for the page to load. I have provided images to show the number & placement of each pixel & I marked the length of segments that are longer than 2 pixels.
For this tutorial, you will need:
Jasc Paint Shop Pro - Get a 30-day free trial here. (Note: This tutorial was made using PSP 8, but it may be possible to do it using other versions.)
Feedback is always appreciated. If you are having a problem with this tutorial, please e-mail me for assistance.
1 - Open a new image in PSP approximately 200 X 150 pixels, 16 million colors, transparent background. I flood filled my first layer with white to help me see what I was doing. If you do this, don't forget to add a new raster layer before starting! We are going to add everything on the same layer. If you mess up, just go to Edit --> Undo or use your eraser tool.
2 - Activate your paintbrush tool & set it to size 1, step 1, and hardness, opacity, & density all set to 100. Change your foreground color to #524A4A and draw the following shape on your canvas. It doesn't matter where you place it because we're doing everything on one layer, so if you run out of room just use your mover tool to move the object over. Draw the object using one pixel at a time. Zoom in if you need to. Don't worry if you can't get the placement of the top piece (the one that isn't connected to anything yet). You can add it later after you have a point of reference.
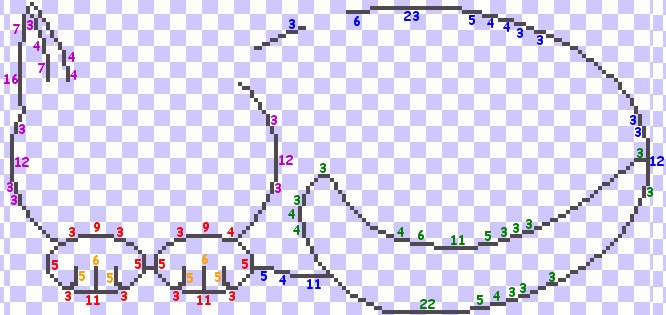
Color Key - Red = Feet; Orange = Toes; Blue = Body; Green = Tail; Purple = Head
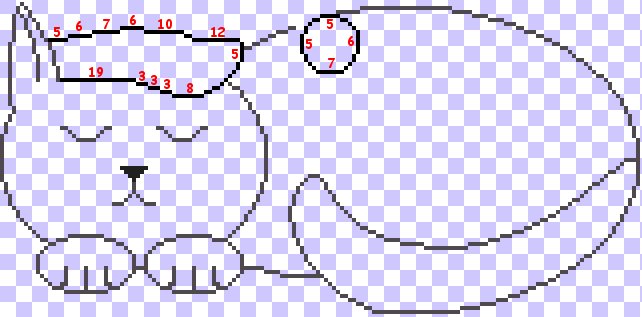
3 - Use the same color to draw the eyes, mouth, & nose. Use the picture below for placement & number of pixels. Each block in the grid is equal to one pixel.
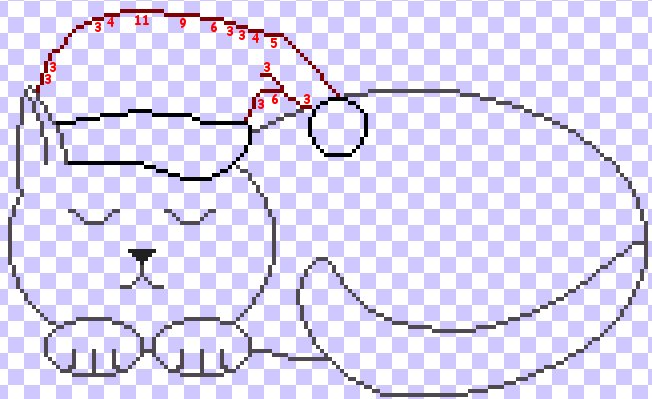
4 - Use black to draw the hat trim. Use the image below to help you. All pixels are added to those that you added in the last step & the numbers only indicate the new pixels, not the length of the entire row.
5 - Use #800000 to draw the hat. Use the image below to help you. Once again, all pixels are added to those that were there before.
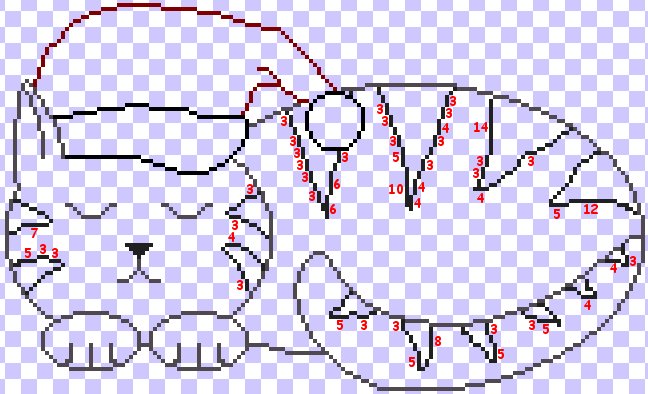
6 - Use #202020 to draw the stripes. Use the image below to help you.
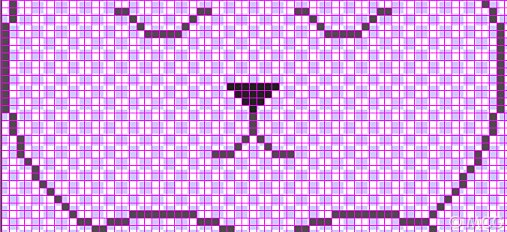
Whew! The outline is finished & the hard part is over! Take a break if you want, then continue on to page 2 to finish your cat!
~Home~
Graphics, web design, & content © 2003 Jennifer Chappell. All rights reserved.
The graphics and content of this site may not be duplicated, electronically or otherwise, without the author's permission.
|
|
|