Shawn's Cormorant 16
Click on bordered photos to see an enlarged view

Building the Forms
Hull Stripping
Deck Stripping
Deck Recess
Coaming and Hatches
Finishing Steps
Launching
Fitting Out and Customizing
Materials Sources
*Note: This is my third kayak, so forgive me if I didn't pause very often to take photos.  There are some excellent kayak building websites out there that have plenty of photos of all the basic steps.  These are photos only of the unique things I've done with this hull.  Besides, this one has been a lot of fun to build...trying new things....and I've been too obsessed to stop and take photos!

I also made a few mistakes along the way.  I will describe them to show the reader that you can cope with ALL your mistakes and still end up with a great, seaworthy boat.  The mistakes will be little more than memories you can later laugh about.

Chapter 1: Building the Forms
 
"An easy boat that took forever to build" I started this boat in December, 2000 while living in Moscow, Idaho.  Lofted the panels, cut them out, scarfed them, and then got a job promotion and moved to Kalispell, Montana.  The panels waited in the rafters of my new garage from May 2001 until I pulled them down and got things going again in February 2002.

It's really cold in February in Montana.  I have an unheated garage.  I glued the seams and figured I'd bring the boat into the house 2 days later to finish curing the epoxy and to pull the copper wire stitching.  The next morning, the epoxy had warmed up and softened, and all the panels had pulled apart.  Oops.  Fortunately, I didn't get any epoxy on my wife's couch!

I re-stitched the hull and left the stitches in until I glassed the hull.  Some PU glue along the chines later held things in place nicely.

After stitching the hull, I hot glued in temporary forms from 1/2" x 3/4" cedar scraps.  The scraps were glued together with polyurethane glue.  This step was my first experience with the PU glue, and I didn't know to wet the strips first.  I had a lot of failed glue joints.  I learned.

I later learned that plenty of water, then the PU glue, then heat from a heat gun makes for a fast, tough glue joint with good penetration.

Chapter 2: Hull Stripping
 
These photos show the stripping of the hull. I cut a big swoop out of the side panel to let the strips come down almost to the chine line.  I think it will look nice.

I had some difficulty keeping the extreme bends in place.  Water, a heat gun, and polyurethane glue in various proportions kept things together well.

Chapter 3: Deck Stripping
 
The deck received strips matching up with the side panel strips.
The interior of the deck got a herringbone of 3/4" wide spruce and 1/4" wide mahogany strips.

Chapter 4: Deck Recess
 
Here's where I got clever.  Thanks to a post on the KBBBs from Mick Allen, I got inspired.  Instead of a straight-across, flat recess, 45º strips are glued in, holding the flat recess an inch or more lower.
Then, the flat recess is glued underneath that.

I plan to do a "Nick Schade" style coaming riser with vertical strips.  Not as pretty as a stacked veneer coaming like my Guillemot's, but a lot quicker build.

Bow stripping is actually surfave-applied veneer cut from spruce strips.

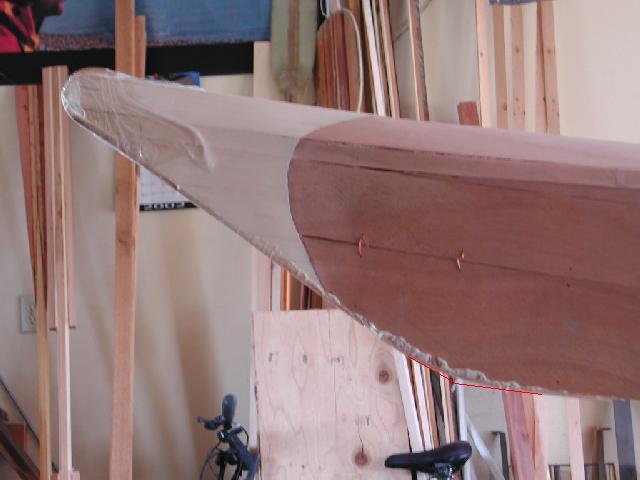
Protective stem band is two strips of steamed 1/16" thick ash.  I bashed the bow of my Chesapeake one time on a submerged "loving rock", and the soft-ish Okoume wrinkled right up and let the glass crack and water in.

This has never happened with the Guillemot--ash outer stems are harder under the glass, and the bow has more curve where stem transitions to keel.  The original transition of the Cormorant is shown by the red line.  I curved it more for protection of the transition.  This area will get extra glass

The obligatory photo of the deck being glassed
Mistake #2:

A photo of the boat before the torrents hit.  Notice all of the beautiful dry wood!  That didn't last long! :)

9/8/02 Then, something really bad happened.  I took  the unfinished Cormorant to the Northern Rockies Meet at the Beach, and during a rainstorm, the interior got soaked. I saw the rain coming (hull was glassed, too), and I tipped the boat upside down.  It still got totally wet inside.  I had taped the seams with packing tape to seal them...good, but not good enough.  Water ran in there, and also splashed up from the surrounding ground.  (Forrest Gump: "Thar was this big ol' fat rain")

We're talking major swelling, and differential swelling of the mahogany and spruce deck strips that's very visible under the glass.  It will still paddle great, but will be a 30' boat instead of a 2' boat. 

9/10/02  Set the boat in the sun yesterday with a box fan and a couple of Shopvac hoses (taped fan into a cardboard box with the hoses taped in the other side) to ventilate the ends.  By last night, most of the swelling had receded, and the boat looks pretty normal--wow!!

Chapter 5: Deck Fittings
 
I used "Maroske" deck fittings as shown on Gabriel Romeu's kayakoutfitting.org website.  To smooth the glass on the backside, I covered the wetted glass with plastic kitchen wrap, then a piece of 1" open cell foam, and a small board over that to spread the clamping pressure.  With this sort of "poor man's vacuum bagging", very little fill coating is needed afterward.

I installed 18 fittings...it's easier to install them now than later.  One each at the extreme bow and stern for end toggles, one each a bit back from bow and stern for the perimeter lines to pass through. A fitting a maximum of 3' along each sheer for perimeter lines, 4 pairs along the foredeck for foredeck rigging, 2 pairs behind the cockpit, 2 pairs for paddle blade holders at bow and stern, and a fitting centered in the middle of the aft deck, "BCU Style" to hold the blades toward the cockpit (even though I don't like them that way).

Chapter 6: Coaming
 
Coaming riser is vertical strips of clear spruce, essentially the standard 'Nick Schade style', and 5/8" x 1/4" coaming lip is made of 10 strips of ash and mahogany veneers, the contrasting mahogany strips are inspired by Joe Greenley.

Everything is covered by at least one layer of glass.  Just epoxy over wood isn't abrasion resistant enough for long-term use.

Chapter 7: Finishing Steps
 
Watch here for future progress...

This kayak will likely have 3 bulkheads and a day hatch.  Bulkhead at cockpit will be sloped to minimize cockpit volume and maximize day hatch volume.  Magnetic hatch hold-downs.  There are also "Maroske Fittings" at each hatch location, so I can back up the hatch with an external strap for travel or rough water play.

Chapter 8: Launching
 
The Cormorant was launched during a nighttime, winter paddle on December 9, 2003, so it was too dark to take pictures!  We paddled out to a small island in Somers Bay and feasted on spaghetti, chocolate chip cookies, and brownies.
3/31/03: I love the way the spruce swoop fits a wave.

Chapter 9: Fitting Out and Customizing:
 
I installed perimeter lines already.  I put in a pair of temporary bungies on the foredeck, but I think I'll rig it "Greenland style" with hard lines and sliders.
I also need to build a fiberglass seat like I installed in the Guillemot.

Chapter 10: Materials Sources:
 
The hull 4mm okoume ply was leftover from the Chesapeake project in 1998. Deck spruce and mahogany were from the local lumberyards. Cedar strip recess was done with scraps from a construction project. Ash and mahogany veneers for the coaming lip were leftovers from the Guillemot project.

I plan to use Raka epoxy and leftover glass from Hamilton Marine. I will order the same Aquameter Skipper from Cyber-Marine for this one.


Supplier and materials ordered Cost for portion of order used in boat
Hull wood purchased @ CLC in 1998
4mm okoume
$45
Deck wood purchased locally in Montana.
Spruce, Mahogany
$20
Epoxy and accessories from Raka in Florida.
1 gallon
$40
12 yds 5.5oz x 50" cloth from Hamilton Marine in Maine.  Unfortunately, the $2.99/yd cloth is no longer in stock.  :(
$36
2" Fiberglass tape from John R. Sweet, in Virginia
$5
Ash for protective outer stems from board bought at Edensaw in Washington.
$3
ROS Discs from Klingspor in North Carolina
$5
Magnets from Lee Valley (no hatches installed yet)
$7
Spar Varnish - 1 qt.
$15
Bungies, decklines, etc.
$15
Total Cost
$191

Shawn's Sea Kayaking Home

Copyright © 2002 Shawn W. Baker