MIDI-Mouse Instructions
Introduction
MIDI-Mouse has two windows, the first which can be used to generate up
to four MIDI continuous controller (CC) messages calculated from the
mouse position and the second which can generate up to another four
MIDI CC messages calculated from two selectable externally-generated
CC messages. In addition, it is possible to assign MIDI note messages to
most of the keys on the keyboard. Typical use would be for the control
of soft-synths such as those in ReBirth and Reason from Propellerheads,
but it can be used with any program or external MIDI device that responds
to CC messages. The program requires OMS version 2.2 or greater, and has
been successfully used with MacOS versions 7.6 to 9.1.
Starting up
Running the program for the first time will open first a splash window
while OMS is initialised and the preferences file is read (if present).
Assuming all goes well, the following dialog window will open:

The pop-up menus are for the selection of the input and output ports
that the program will use. MIDI messages arriving on the two input
ports can be mixed to the output A port, along with the CC messages
generated by clicking in the control square. The CC messages from the
input transformer can be sent either to the output A or output B port.
Set Input B to be the same port as Input A to disable it, and likewise
Output B will be ignored if it is the same as Output A. After selecting
the various ports, press Ok to continue to the main program.
TIP: the port selection dialog at startup can be disabled in
the Preferences dialog.
The MIDI-Mouse window

This window always remains open, and represents the control centre for
generating CC messages by clicking with the mouse in the control square.
At the top of the window there are "LED" indicators which flash to indicate
MIDI activity. The Tx LED turns green whenever the program is sending MIDI
messages. The Rx LED flashes green whenever MIDI data is being received on
Input A (in case of too much data it may flash red, indicating data loss
due to buffer overflow but this should not happen in normal use). The Rx B
LED flashes green whenever MIDI data is being received on Input B. If
Inputs A and B are the same port then the RX B LED is greyed out.
Next to the Rx B LED is the Input Mix popup menu which selects which input
data to mix to the Output A MIDI Port. If set to "Mix Off" then no data
from either input will be sent, but it will still be possible to see if
input messages are being received by watching the RX LED's.
TIP: since MIDI feedback can cause system instability, in cases where
such problems can occur - for example sending CC messages to a sequencer
via IAC with MIDI Thru enabled - check that the Rx LED's do not echo the
Tx LED before enabling the Mix option.
Below the MIDI LED's is the control square. Click in this square to
generate CC messages according to the patch settings (see
below). Two modes of operation are possible, selectable in the preferences
dialog:
(a) Click and hold
Click in the control square, holding down the mouse button and moving the
mouse to generate CC messages. In this mode the control square turns light
blue(*) when active.
(b) Click on / Click off
Click once on the control square, the control square turns light orange(*),
and move the mouse to generate CC messages. Click again in any of the
windows or on the menu bar to stop again.
(*) these are the default colours, but they can be changed in the
Preferences dialog.
New in version 1.0.1
A MIDI command - either a note or a CC message can now be generated on
clicking/releasing on the control square. This can be used, for example,
to automatically activate the effect to be controlled just by clicking
in the control square and then have it automatically switch off again.
The options are (in the Preferences dialog):
Off:    No message sent
Note    Note on/off sent when control square is activated and again when
        it is deactivated
CC      CC with value of 127 sent when control square is activated, and
        then with value of 0 when it is deactivated
The channel and note/CC number can be chosen as desired.
To the right of the control square are four bars used to graphically
represent the CC output values. Bars corresponding to disabled CC output
channels will be greyed out.
Below the control square are the patch selector and the patch name. The
patch defines how the CC messages are generated from the mouse position
and is described in more detail below. There are ten patches available.
Click on the patch number or press the corresponding number key on the
keyboard (press '0' for patch 10) to change the patch. Note that the
patch cannot be changed while the control square is active, and pressing
a key in this situation will only cause the program to signal the error
with a beep.
Patches
Each patch has a name which can be edited (up to 25 characters). For each patch
there are four CC output channels (A, B, C, and D). For each channel it is
necessary to set the following parameters:
(a) Algorithm
This is a popup menu which sets how the output value follows the mouse position.
X represents the horizontal position and Y the vertical position. Both X
and Y have a range of 0 - 127. The available settings are:
Setting     CC value sent (CC range 0 - 127)
Off           No CC output
X             X value
Y             Y value
X + Y         X + Y
X * Y         X x Y
! X           127 - X
! Y           127 - Y
! (X+Y)       127 - (X + Y)
! (X*Y)       127 - (X x Y)
X - Y         X - Y
Y - X         Y - X
(b) Multiplier
This is a popup menu which allows the result of the algorithm to be
scaled (note that the values sent are always limited to the legal
range of 0 - 127).
(c) MIDI Channel
The calculated CC value is sent with this MIDI channel.
(d) CC number
The calculated CC value is sent as this MIDI controller. As an example, 1
corresponds to the modulation wheel on a typical MIDI keyboard.
TIP: holding the Command (Apple) key down and clicking on this text will bring
up a popup menu which can be set up (see the CC Name Mapping settings) with
the names of the controllers for easier programming.
(e) Zero reference
The CC values are calculated as the difference between the control square
and centre and the click point (so they are -63 at the bottom/left of the
square, zero at the centre, and +63 at the top/right). After applying the
algorithm and then the multiplier, this value is then added to the zero
reference value before limiting the output to the allowed range of 0 - 127.
The zero reference allows the centre point of the output values to be
shifted. Use 64 as the default value.
If this all sounds too complicated, just experiment with the patch files
provided with the program. Here are some simple examples:
Follow horizontal mouse position
Algorithm       X
Multiplier      * 1
Zero Ref        64

Follow vertical mouse position, but reversed (127 -> 0 instead of 0 -> 127)
Algorithm       ! Y
Multiplier      * 1
Zero Ref        64

Follow horizontal mouse position, but with a range of 0 - 64 (ie centred on 32)
Algorithm       X
Multiplier      * 0.5
Zero Ref        32

Cross-fade two faders, following the vertical mouse position
(with Fader A responding to CC 12 on MIDI channel 1, and Fader B
responding to CC 11 on MIDI channel 2)

Fader A                      Fader B
Algorithm       Y            Algorithm       ! Y
Multiplier      * 1          Multiplier      * 1
MIDI Channel    1            MIDI Channel    2
CC Number       12           CC Number       11
Zero Ref        64           Zero Ref        64
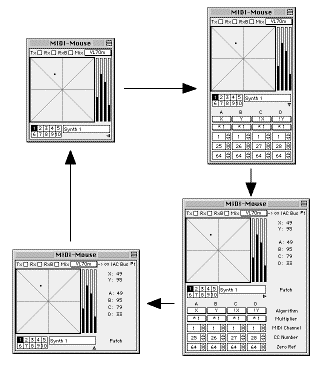
The final control to note is the window mode selector (a small triangle).
Clicking on this triangle changes how much of the window is visible. Four
possible settings are available, in the sequence:
The Input Transformer window
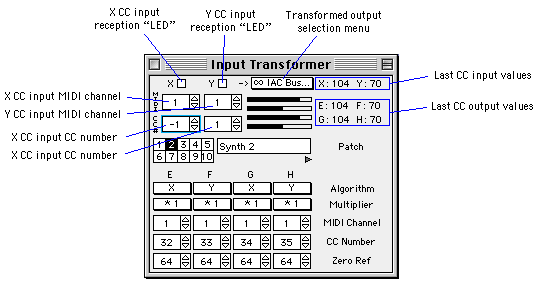
The Input Transformer works on exactly the same principle as the MIDI-Mouse
window, with the only difference that the X and Y values are taken from
externally-generated MIDI CC messages. The X LED at the top of the window
will flash yellow when receiving the correct MIDI CC message, set by the
two edit boxes directly below it which are used to set the incoming MIDI
channel and CC number. As an extra option, set the CC number to -1 to
respond to pitch bend information (the box will be highlighted with a
light blue colour when set to respond to pitch bend). To the right of
the X input channel settings are the Y LED and the corresponding two edit
boxes for the Y input.
TIP: the CC Name Mapping popup menu is available also for the X and Y
input CC number edit boxes.
To the right of the Y LED is the popup menu which selects the output port
for the CC messages generated by the Input Transformer, and below this are
four horizontal bars to represent the CC output values (greyed out if the
corresponding channels are disabled).
Points to note
The Input Transformer X and Y CC messages can come from either (or
both) of the two available input ports.
The Input Transformer is only active when the Input Transformer window is
open.
If input mixing for the corresponding input port(s) is active, then the X and
Y CC messages will be passed directly to the output if the Input Transformer
window is closed.
The patch values are interchangeable with the MIDI-Mouse window, and can
be copied and pasted between the two windows.
Click on the patch select number or hold down the Control key and press the
corresponding number key to change the selected patch.
The Input Transformer can be active while using the MIDI-Mouse window, for
a total of eight possible CC channels active simultaneously.
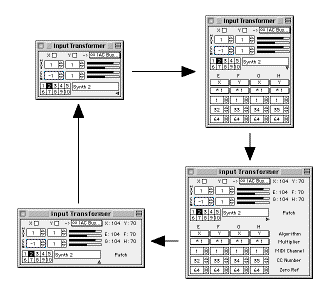
The window mode selector is present in this window as well. Four possible
settings are available, in the sequence:
The CC Names mapping dialog
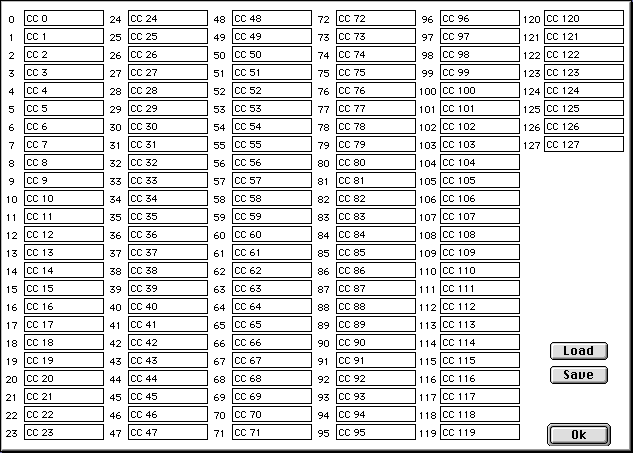
This dialog allows the names used in the popup menu accessible by
command-clicking the CC number edit boxes in the MIDI-Mouse and Input
Transformer windows. The number to the left of each box is the CC number
to which the text will be associated. Name length is limited to 25
characters. Click on the Save button to save all the names to a file. Click
on the Load button to reload the names. Two CC Names map files are provided
with the program in the "MIDI-Mouse CC maps" folder:
Empty CC Map contains the basic CC NNN names (for resetting
without quitting)
Standard MIDI CC Map contains the names of the standard MIDI
control change names
The Keyboard Note mapping dialog
In order to generate MIDI note messages from the computer keyboard it is
necessary to enable the MIDI notes in the keyboard note mapping dialog.
This dialog has four "pages", selected using the radio buttons at the top
of the dialog window. The left three buttons choose the pages for the
various key characters, divided into lower case (a - z), upper case (A -
Z), and other characters. An example is shown below:
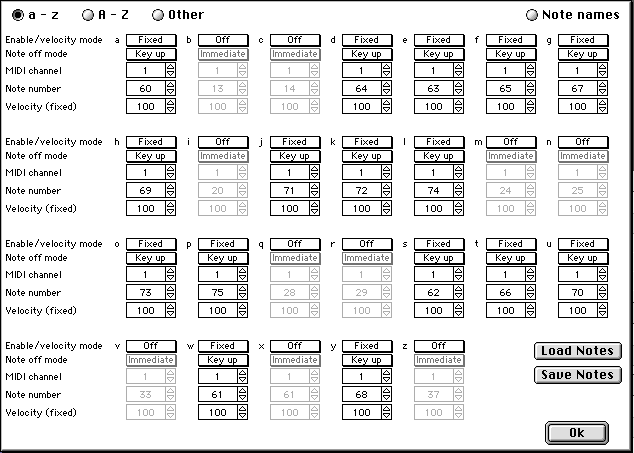
Note key mapping
For each keyboard character there are five parameters to set:
(a) Enable / velocity mode
This is a popup menu with the following options:
Off: key disabled
Fixed: pressing the key will generate a MIDI note on/off message
with the fixed velocity setting
CC A - H: pressing the key will generate a MIDI note on/off message
with a velocity value determined by the last output value of the selected
CC output channel (so that the velocity can follow the mouse position). In
the case of the output channel not being active, the fixed velocity setting
is used.
(b) Note off mode
This is a popup menu with two options:
Immediate: in this mode the note off message is sent immediately after the note on
message. Use this mode for fastest response when the note length is not significant - eg drum notes
Key up: in this mode, the note off message is sent only when the key is released.
Use this for notes with sustain
(c) MIDI channel
Use this edit box to set the MIDI channel of the note to be sent.
(d) Note number
Use this edit box to set the note number to be sent. Hold down the Command
key and click on this box to select the note using the Note Names mapping
menu (see next section)
(e) Fixed velocity
Use this edit box to set the note velocity to be used for the Fixed
velocity note mode
The note key mapping can be loaded and saved using the Load Notes and
Save Notes buttons in the dialog window. One file contains the settings
for all the available keys, regardless of which of the three key pages is
selected. Note that the key map file does NOT contain the note names
mapping information
Note names mapping
To make the note selection easier it is possible to set names for the note
numbers, in the same way as for the CC names. Clicking on the Note Names
radio button at the right of the dialog window selects the note names
mapping page of the dialog:
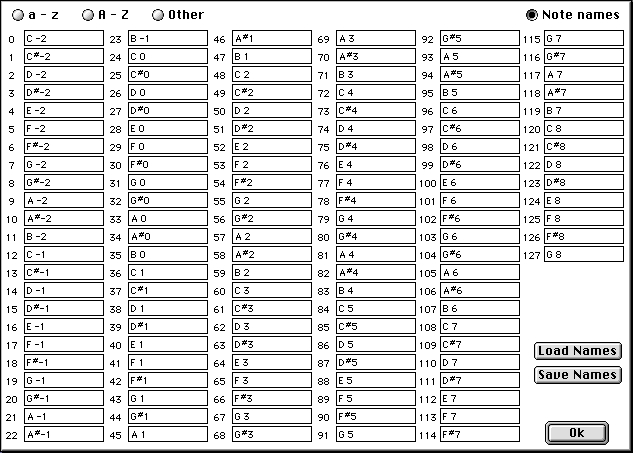
In this page it is possible to set a name (up to 25 characters) for each
note name. These names can be recalled as a popup menu by
commmand-clicking on the note number edit boxes in the note key mapping
pages. The names map can be loaded or saved using the Load and Save
buttons. Note that the names map file does NOT contain the information
from the note key mapping pages
Note that the position of the keys on the keyboard is not taken into account,
only the character generated when the key is pressed, so the supplied maps
may need to be adjusted according to the keyboard layout.
The Preferences dialog
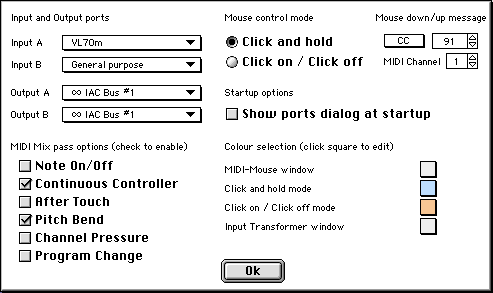
At the top left of the dialog there are popup menus for changing the input
and output ports without quitting the program. At the top right, there are
buttons for setting the mouse control mode for the MIDI-Mouse window, and for
disabling or enabling the port selection dialog when starting up the program.
To the bottom left are check boxes for setting which MIDI messages are
passed on to the output from the mix inputs. If the box is not checked, the
corresponding MIDI messages are blocked. To the bottom right are four
coloured squares which show the present colours used for the window
backgrounds and for the active modes of the control square. If the colour
picker extension is available in the system folder, clicking on the
coloured square will allow these colours to be changed. All preferences are
stored in the MIDI-Mouse Prefs file which is saved in the same folder as the
MIDI-Mouse application.
MIDI-Mouse menus

About MIDI-Mouse... brings up a message showing the version number
of the program, a reminder of the web site address, and how much memory is
available to the program.

Open... will open the standard file dialog for loading a patches
file. This can be used to load patches both for the MIDI-Mouse window and
the Input Transformer window. When both windows are open, the patches will
be loaded for the frontmost window, which will be highlighted with a red
outline around the patch selector and patch name area.
Close is available when either the Input Transformer or
MIDI Analyser windows are open and frontmost, and simply closes them.
Save... saves a patch file containing the ten patches of
either the MIDI-Mouse window or the Input Transformer window. When both
windows are open, the patches are saved for the frontmost window, which
will be highlighted with a blue outline around the patch selector and
patch name area. The patch files are identical in format for both
MIDI-Mouse and Input Transformer windows, and so are interchangeable.
Quit use Quit to exit from the program.
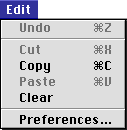
Undo is not implemented and will always be dimmed.
Cut is available only when text selections are active and
performs the usual text cutting operation.
Copy has two functions. When text selections are active
then it performs the usual text copy operation. When no text boxes are
active, however, it can be used to copy the selected patch in either the
MIDI-Mouse or Input Transformer windows (if both are open, the patch is
copied from the frontmost window). When Copy is selected for a patch, a
blue outline rectangle around the patch selector and patch name area is
flashed for a moment to indicate the copy source.
Paste has two functions. When text selections are
active then it performs the usual text paste operation. When no text
boxes are active, however, it can be used to paste a previously-copied
patch to either the MIDI-Mouse or Input Transformer windows (if both are
open, the patch is pasted to the frontmost window). When Paste is selected
for a patch, a red outline rectangle around the patch selector and patch
name area is flashed for a moment to indicate the paste destination.
Clear has two functions. When text selections are
active then it performs the usual text clear operation. When no text
boxes are active, however, it can be used to reset the selected patch
in either the MIDI-Mouse or Input Transformer windows (if both are
open, the patch is pasted to the frontmost window). When Clear is selected
for a patch, a red outline rectangle around the patch selector and patch
name area is used to indicate the patch which will be cleared, and a
dialog is opened so that the clear operation can be confirmed or cancelled.
Preferences... opens the Preferences dialog.

OMS Version... displays a message containing various
details of the OMS drivers installed.
OMS Studio Setup... opens the OMS Studio Setup program (*).
OMS MIDI Setup... opens the OMS MIDI Setup window (*).
MIDI Analyser opens a window with a rudimentary graphical and
hexadecimal display of the MIDI data being received, or brings it to the
front if it was already open. If it isn't obvious how it works and what it is
doing then it won't be any use me explaining it anyway :)
* it is quite likely that the program doesn't respond correctly to all the
possible changes that can be made with these two options - you have been
warned...
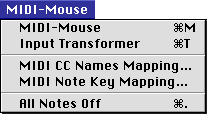
MIDI-Mouse brings the MIDI-Mouse window to the front.
Input Transformer opens the Input Transformer window if it
is not open, or brings it to the front if it was already open.
MIDI CC Names Mapping... opens the CC names dialog.
MIDI Note Key Mapping... opens the Keyboard Note mapping dialog.
All Notes Off sends note off messages for all presently
defined key notes. This may be necessary in cases in which notes remain on
after releasing the keys, for example if the Caps Lock key is pressed while
other keys are held down.


