Overdriving Fluorescent Lightsby James L. Haworth
p>
Overdriving
fluorescent bulbs is a method of getting more light from each bulb than
is
normally obtained. It involves taking the light fixture apart and
rewiring the insides.
Each electronic ballast normally drives either two or four bulbs. The
ballasts
are then tied together in such a way that a two-bulb ballast now drives
a
single bulb and a four-bulb ballast drives only two bulbs, sometimes it
only
drives one. Usually, an extra ballast is put into the fixture and wired
into
the bulb circuit. For instance, if you have four bulbs in the fixture
and they
have a four-bulb ballast, this ballast now drives two bulbs and another
four-bulb ballast is used to drive the remaining two bulbs. If the
directions
in this article are carefully followed, this rewiring is not dangerous
and the
bulbs won’t blow up, they simply become brighter. The bulbs are limited
by
their design to draw only so much current and no more. If you double
the amount
of current, you won’t get a bulb that’s two times brighter because the
efficiency drops off a bit. So even after the increased current is made
available, a bulb driven by a factor of two times its normal supply,
only gets
1.7 times brighter. You can do a 1x, 2x, or 3x overdrive with a four-lamp
ballast, but the efficiency drops. (4x output into one bulb is only
2.4
times as bright as normal).
Put another way; the output of the
bulbs does
not increase in direct ratio to the amount of power the ballast
consumes. The
more times you overdrive a fluorescent bulb, the less efficient it becomes, as it
is
starting to drift out of the bulb's optimal design parameters.
The information for this article was
partially
gleaned from postings on forums all over the Internet. The forums
included
gardens (seed starting), fish/aquarium (freshwater and salt water),
houseplants, pro studio photography, reptiles, electronics, and others.
If you
see postings here that you’ve seen elsewhere, keep in mind that I’m
just trying
to bring some semblance of order out of the inherent disorder of every
forum
out there that deals with this subject. If you have a question about your particular application,
please try
some of these forums. There are people who are very knowledgeable about
the
process of overdriving and they are willing to help you. Many, many
people have
rewired their fluorescent fixtures with no explosions or house fires that I know of. There are people out there that are deathly afraid of electricity, and if you are one of them, perhaps you shouldn't rewire your lamps. If you haven't overdriven your own fixtures, please don't be a nervous nelly and post gloom and doom predictions of disaster for those who want to try this.
The data
took many hours to put together into a more or less readable form.
Sorry
there’s no way to give proper credit to everyone who contributed to
this huge
Internet pool of information.
This is a rather long article and
seems to be
very complicated, but really, it’s not bad once you get the core idea
of what’s
involved. Don’t be apprehensive. Check each step carefully and then
recheck.
You’ll be fine!
Safety first!
I must issue a warning or three. If
you don't
know much about working with electricity, you should read up on
electrical
wiring techniques.
Don’t even think about using
a magnetic
ballast, it won’t work for overdriving fluorescent lights, and you might have a very
smelly
incident as the internals melt down.
Utilizing ODNO (Overdriven
Normal
Output) fluorescent lighting technology will likely void your warranty
on
ballast and/or bulbs. We are not responsible for damage caused by
improper use
or failures due to overdriving fluorescent lights.
Use or install a GFCI fixture to plug
your
fluorescent fixture into after you’ve rewired it. Use a power strip
with a
circuit breaker on the strip if you don’t have a Ground Fault Circuit
Interrupter. This will offer a degree of protection for you, if you’ve
made a
mistake in the wiring. Always make sure a ground wire is connected to
the
fixture! This is for safety and it helps the lamps to start when the
metal
reflector is grounded.
Be careful if you’re using this setup
to power
lighting for an aquarium, you know, electricity and water. Nuff said.
Why electronic
ballasts?
Fluorescent lights have notoriously
been known
for flicker and hum. This is no longer a problem with the new electronic
ballasts. This is because with magnetic ballasts the fluorescent lamp
actually
drops out of ionization and get re-ionized 60 times a second.
Electrical
engineers discovered that once you speed the process up to at least
4,000 Hertz
(cycles per second), the gas stays ionized (no more flicker). This is
also a
bit more efficient. And, since the notorious hum would now become a
squeal,
engineers design electronic ballast to oscillate above the range of
human
hearing. No more noticeable hum.
First, you are not rewiring the
ballast. You
are rewiring the outputs of the ballast (nothing internal).
Electronic
ballasts which operate more than one lamp often show several wiring
options, so
the same ballasts can be used in several configurations, thus saving
the
manufacturer money. What rewiring to overdrive lamps does, is cause the
circuitry to see a different load drawing the current. The output
transistors
can do this and still be functioning within proper specifications. This
is
neither dangerous nor illegal; it’s simply the way electronic ballasts
are
designed. The most telling thing about the results is that, using a 2x
overdrive; the ballast draws less power with one lamp than it would
draw
normally with 2 lamps. The two output transistors are teaming up and
actually
drawing less amperage than normal (with 2 lamps).
Put another way, when you re-arrange
the output
of the ballast wiring to overdrive a lamp, you are sharing the "lamp
load" between the individual lamp circuits. The ballast itself is
actually
UNDERDRIVEN, since it is now sending LESS total current to a single
lamp than
it would normally be sending to two lamps. It is the lamp that
gets
OVERDRIVEN. The ballast is running cooler, the bulb running hotter.
This does
not burn out the bulb, although it's life is shortened a bit.
The ballasts used for overdriving are actually
running below
their normal capacity, sharing the duty, and drawing less than normal.
I have
done this with 7 different types and wattages of electronic ballasts
and they
ALL worked well.
In a two-lamp fixture, overdriving
(which
requires a ballast that drives 2 or more lights) involves disconnecting
the
wires from both ends of one lamp's socket, and joining them to the
wires of the
remaining lamp. This results in a 32w lamp being driven to put out
approximately
1.7 times as much light as normally produced. This will reduce the life
of the
lamp somewhat, but in the overall picture it is very economical to
replace a
32w bulb-even twice as often. With fluorescent lights, over 95% of the
total
cost of using the bulb is the electricity, since the bulbs last so long
to
begin with. I used both a current meter and a light meter to compare my
results. Your own eyes can DEFINITELY see the difference.
On
the T8’s and T12 bulbs, this 2-pin plug and socket are called “medium
bi-pin”.


This picture shows the power cord crimp twisted
out of the
fixture to allow more of the cord to be shoved inside the fixture.
The little plastic power cable “pass-thru clip” on
the metal
case is a little tricky to get loose, if you need to do that. With the
right
pair of pliers you can compress the clip and pull it gently to squeeze
out of
the hole. I often remove it for one reason or another, but sometimes it
is just
easier to splice the wires that you need to lengthen, rather than
pulling out
the plug to get more length.

The power wires were held together
with a crimped connector (lower right in this picture and picture
above). I
squeezed that connector after I pushed the power wires further into the
fixture
and pushed it back into the hole in the fixture. Then I used regular
twist on
wire nuts (red-orange on left side of picture) to add the second
ballast as
shown here. How you "mount" the second ballast in the fixture: I took
the screws out of the existing one and simply wedged the second one in
next to
it. Get a few sizes of wire nuts. Sometimes you'll be splicing just two
wires
together. Sometimes you'll be splicing four, and need a bigger wire
nut.
Since the wires are longer on one side of the
ballast than
the other, I found out that I can turn the second ballast around, mount
it on
the other end, and the wires will reach just fine. I mount it wherever
the
wires will conveniently fit right.


These two pictures are of the side of the fixture
where you combine the blues
and reds on the Rapid Start system. See diagram below.


This is the way the tombstones look on the other
end after
the ballast is rewired on the Rapid Start system. Diagram to
the
left.
It was a pain-in-the-butt to figure
out how to
get the existing wires out of those “push-in-and-stay-in” type sockets.
Do not
pry the back off of the sockets. I did that once, early on, and broke
the
plastic socket apart doing it. I finally developed the knack of doing
what I
can only call a “twist and wiggle” technique to get the existing wires
out of
their slot. Although I can get most of the wires off, I still end up
breaking
off 10-15% of them. Since you end up with a couple of extra sockets
anyhow, you
can afford to mess up a few of them. As a last resort, I would have
gone ahead
and cut and spliced the wires if I couldn’t get the wires wiggled out
of the
socket. Once you push that wire in, it wants to stay in. Trial and
error will
hopefully lead you to a useable technique.
After
you use the four-lamp ballast to overdrive two fluorescent lights, take the electronic
four-lamp
ballast out of another four-lamp fixture and place it in the first
fixture. Now
wire the second ballast to the third and fourth lamps using the same
wiring
techniques as you did with the first ballast.
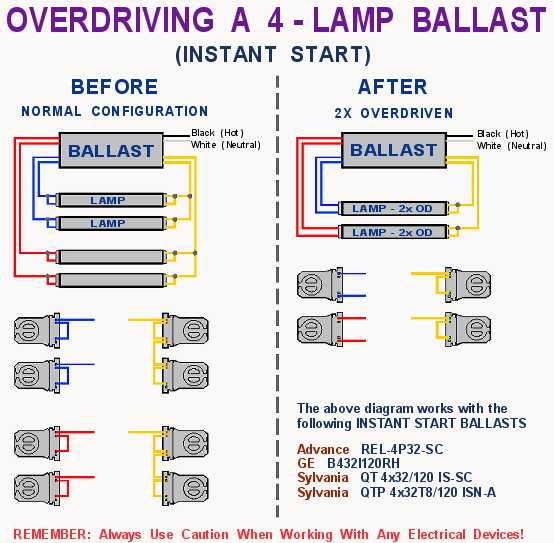
Home Depot
sells a GE
ballast for
4 lamps, B432I120RH. Another commonly available 4-lamp ballast is the
Advance REL-4P32-SC.
Both of these can be used to overdrive 2 fluorescent lamps. If you
use
either of these two ballasts I mentioned above, be aware that those are
Instant-Start.
Without going into the technical differences now, the instant-start
method has
only ONE wire going to each socket, and the socket will have the two
connections (lamp pins) jumpered together. Instant-Start
fixtures have
only one wire normally go to each socket with the socket’s two
connectors being
shorted together. Instant Start ballasts are actually a little
simpler
to wire together – coupling two wires together instead of two PAIRS of
wires.
So far I have overdriven at least 20 ballasts,
with no
problems. You will be left with a lot of fixtures with bulbs but no
ballasts. I
used my Dremel tool to cut some of them up and make custom fixtures,
reflectors
and what not. Try this with overdriving: On the workbench, instead of
using one
48”-32w bulb, try lining up 2-24” 17w T8 bulbs in series and jumper two
of the
bulb end together - sort of making one long 48” bulb. You will find
that one
Sunpark ballast will overdrive them in series like that. THEN, make
yourself a
24” 2-bulb fixture following the wiring you used.
You can make a small, really bright overdriven fluorescent
light that
way. I made a 24” 4-bulb fixture using 2 overdriven ballasts.
Even better, instead of the standard
medium
bi-pin sockets, find a 2G11($3.50) socket and a 22” Philips PLL 40w
twin tube
compact lamp ($10 or less some places). One 40watt lamp of that type
will GLOW
LIKE ALL GETOUT with that ballast.
Overdriving
will also
work on black lights, if you have a need for such things.
 If you
don’t want to monkey around with getting the
wires in and out of the sockets you can use solderless tap connectors -
the
ones I know of are called Scotchloks. Home Depot and Radio Shack should
have
them; just make sure you get the right ones for your wire size. These
let you
tap into a wire without cutting it - for example you could cut off the
red
wires in the middle, then lay the blue wire in the Scotchlok, lay the
end of
the red wire in it, fold over the top and press it together carefully
with
pliers.
If you
don’t want to monkey around with getting the
wires in and out of the sockets you can use solderless tap connectors -
the
ones I know of are called Scotchloks. Home Depot and Radio Shack should
have
them; just make sure you get the right ones for your wire size. These
let you
tap into a wire without cutting it - for example you could cut off the
red
wires in the middle, then lay the blue wire in the Scotchlok, lay the
end of
the red wire in it, fold over the top and press it together carefully
with
pliers.
I located the discussions I had read between
several PhD
level Electrical Engineers who WERE lighting experts. They discussed
the
“overdrive” effect and how it is a good and well-established approach
to
obtaining more useable fluorescent light. One problem I had in
searching is
that they did NOT use the term “overdrive” in their discussion.
Probably
because in their eyes it was a simple circuit reconfiguration, which
has
already been known and has been in use for years.
I did not even try to overdrive
fluorescents,
until I searched the web. I have to say I was ABSOLUTLEY OVERWHELMED at
the
amount of information I discovered about the subject. This
“overdriving” effect
has been a standard, used and perfected, for YEARS in the realms of the
“Fish
and Coral” enthusiasts.
Will overdriving fluorescent bulbs change the frequency of
light
emitted?
First, in regards to frequency shift due to
overdriving a fluorescent bulb, the
light color WILL NOT change. The process is governed by laws of quantum
physics, which guarantee that it will not shift color. I will explain.
This is the process that happens,
either 60 or
120 times a second with magnetic ballasts, or 22,000 to 45,000 times a
second
with electronic ballasts. The ballast initially provides a high voltage
to the
filaments at each end of the fluorescent lamp. When the voltage reaches
a critical
level, the gas in the tube (mainly argon with a little mercury)
suddenly
becomes ionized, and current rushes through the tube. “Ionization”
means an
atom now has more electrons than it normally would contain in its outer
shell.
In this case, extra electrons have been induced to go racing around the
“conduction band” of the mercury atoms to get to the other side of the
tube.
Sufficient voltage pressure is created by the ballast to force the gas
into
ionization in the fluorescent tube.
In the process, the electrons in the
outer
shell of the mercury atoms randomly pick up extra energy and go into a
higher
sub-orbit that normal. Those electrons then drop back to the original
orbit as
soon as possible, which releases an EXACT amount of energy (a quantum
level) as
a photon. That photon will ALWAYS be an exact color frequency based on
the atom
and it’s outer-shell electron. As far as the mercury atoms go, this
will
actually be ultra-violet light (UV), and is not the final color output
of the
lamp.
The actual color that is emitted from
the tube
is based on the type of phosphors, which coat the inside of the tube.
The same
process that I just described above is repeated there, at the phosphor
coating,
when the photons from the mercury atom hit the tube. There the UV
photons are
absorbed by the phosphor compounds and re-emitted at the SPECIFIC
QUANTUM
LEVEL, or color, as the phosphors had been designed to emit. The
photon(s)
emitted cannot possibly violate the energy levels set by nature. More
ENERGY
(by overdriving) will translate to more LIGHT. In this case, it is just
as if
you shone more light on an object, and it got brighter, not colored
differently.
For those who are interested, here is
a link to
a major phosphor manufacturer’s list of all their lamp phosphors, the
exact
color of each and the width (or bandwidth) of color peak: http://
www.nichia.com/lamp.html. I recently read
that this one company, Nichia, is the source of phosphor coatings for
40% of
the fluorescent lamp manufacturers.
Ballasts
Since I began investigating the overdrive
phenomenon, I have
done a great deal of reading on both the electronics theory behind how
it works
and testimonials from real world users. Actually, there are several
ballast
manufacturers (Fullham, Workhorse, Icecap, etc.) who have been
producing high
performance electronic ballasts for many years now. Many of these
ballasts are
designed to drive a wide range of bulbs, with full understanding that
many of
the allowable bulb combos are definitely being powered by more current
than
they were initially built for.
Those ballasts were DESIGNED to be
able to do
that, and this is exactly what people in the know with fish and coral
tanks
have been doing for years. I was delighted to read several discussions
by electrical
engineers who discussed how it works, and why it is a good way to get
more
light from a bulb. The only detrimental effect, they pointed out, was a
reduction in lamp life. I do not think the reduction in lamp life is
significant, or much of a factor in practical use. The people who have
recommended this have usually stated that they change their bulbs at
least once
a year anyhow, and do not have a burnout by then. I have had 2x
overdriven
lamps burning for 12-18 hours a day for nearly a year now- with no
burnouts
yet. Most ALL of the electronic ballasts I have played with were
capable of a
variety of overdrive scenarios.
Some fixtures use an Instant Start
ballast. That is even easier to overdrive than a Rapid Start
ballast
because there is only one lead going to each end of the bulb, instead
of two.
You will also find there is a jumper wire, right at the socket, which
will
connect the two bulb pins together. That is inherent in an Instant
Start.
A Rapid Start ballast has 2
wires connected
to each socket because it initially sends a pre-heating current through
the
filament in the bulb’s end to aid in the initial ionization of the
mercury/argon gas. The filament inside the lamp has a small resistance
(between
the two lamp pins) because it provides a heating function on startup
ONLY if
you are using a Rapid Start ballast. An Instant Start
ballast is
designed to provide a higher starting voltage, eliminating the
need to
pre-heat the filament.
Step by step, this is how we wire our
four
bulb fixtures.
Since you are gonna do this, we shall
vow to
avoid both sparks and ballast killing. And as for the “jiggle”
technique -
actually twisting and pulling at the same time - I was describing
removing
existing wires from their sockets. All of the fluorescent sockets I
have ever
seen have connections where, once the wires are pushed in, they require
some
self-learned trial-and-error method to get them back out. Often they
break off
right at the point you need to re-insert a different wire. I hate that.
Luckily, there are almost always 2 insert slots for EACH of the 2
connecting
points. In the case of an Instant Start ballast you can
probably still
rewire with at least one broken end stuck inside the socket. With luck,
you may
not even have that problem. Also, if you have any non-working fixtures
around,
you can scavenge a socket if you need one.
Now, I want to make sure that I know
you
comprehend one thing in particular about the sockets. The basic
fluorescent
bulb, or lamp, has two pins at each end of the tube. These two pins
plug into
the socket. Inside the lamp, each pin attaches to one end of a heating
filament. One connection point in the socket for each of the two pins
on the
bulb. Each one of those two connection points usually has two
“self-grasping”
slots to insert a wire into. In other words - 4 little insert slots for
ballast
wires on each socket (see pictures above).
With a Rapid Start ballast, a
separate
wire goes from the ballast to each of the 2 connecting points
on each
socket. After the lamp starts up, each of the wires is supplying
current to its
side of the bulb.
Sometimes, on a 2-lamp Rapid Start
ballast, there will be ONLY 2 wires supplying two lamps. This kind of
ballast
can’t be overdriven. The current flows through one wire, and then
through the
filament of the first lamp, then through a jumper wire to other lamp
filament,
then back to the ballast via the second wire. They are connected in
series. If
one lamp fails, both will go out.
On a 4-lamp Rapid Start
ballast, there
are double the number of wires (2 red/2 blue/2 yellow). Both yellow
wires are
actually connected to the same common point inside the ballast, or at
least
they behave that way.
I also want to mention that I used
the term
“pre-heat” because that is what the filaments in a Rapid Start
ballast
are doing. Officially though, there are ballasts which are called
Pre-heat
ballasts. They are in the fixtures that use an extra starter device and
are
only found in Magnetic ballasts, usually the lower-wattage ones. Do NOT
use
these magnetic ballasts for overdriving fluorescent bulbs(ODNO).
With an Instant Start
ballast, only ONE
wire runs from the ballast to each socket. There, at the socket, there
should
be a short jumper wire between connection points which links the 2 pins
of the
bulb together. This SINGLE ballast wire can supply current to both ends
of the
lamp’s filament at once, because the jumper wire is there. This jumper
is a
necessary connection for an Instant Start ballast, so that the
lamp
works correctly. There are some sockets used by manufacturers that
already have
an internal jumper in the socket - for Instant Start ballast
use only..
I haven’t seen one of these, but take note if you have this type.
For an Instant Start (2-lamp)
version, that
“common” side of the ballast always seems to have a single shared red
wire.
On a 4-lamp Instant Start ballast,
the “common”
side usually has 2 yellow wires, each shared by a pair of bulbs.
For anyone else reading this, the
following
information is for 4-lamp Instant Start ballasts only to
overdrive 2
lamps by 2 times. What you want to do is, either - pair up 2 reds and 2
blues
(preferred for simplicity), - or - pair up a blue/red and a blue/red.
On the other side of the ballast(s)
you will
have 2 yellow wires. One wire usually runs to just one side of one
socket.
There will then be a jumper wire, from that socket, to the other socket
at that
end of the fixture. Each of those 2 sockets should have a smaller
jumper wire
to short the connecting points (lamp pins) together. What you want to
do is
REMOVE the longer jumper (between the two sockets) and leave the short
jumpers
(the ones shorting the lamp pins). Now, that yellow wire is supplying
just one
lamp socket, instead of two.
Remove the second yellow wire, which
should be
running to the other two lamps, from the socket it is inserted into.
Then
re-attach that yellow wire into the socket you disconnected (the one
where you
removed the jumper). You have finished the “yellow” side of the first 2
lamps.
Note: Now you know what the function
of the
smaller jumpers are - to short the 2 lamp pins at the end of the tube
together
for an Instant Start ballast. If you find you have the type of
socket
with the lamp pin connections already shorted, then good. You do not
need to
short them together.
On the RED and BLUE side of the
ballast, you
will be pairing up either red/red and blue/blue - or - red/blue and
red/blue,
as described above. (Repeated experiments have shown that either way
will
work). Insert one wire into one side of the socket (the lead to one
lamp pin)
and the other wire into the other side of the socket (the lead to the
other
lamp pin). If you have the kind of sockets which are already internally
shorted, you must connect your pair of wires together at the socket. If
so,
there probably will be 2 push-in slots at that spot. Once you have one
pair of
wires going into each socket you are finished with that side.
Now, you will have the wires that
once went to
4 sets of sockets (4 lamps driven normally), going to 2 sets of sockets
(2
lamps overdriven).
Since you already have an Instant
Start
ballast, you ought to buy the GE/Magnatek B432I120RH that Home Depot
sells. It
is also a 4-lamp Instant Start electronic ballast, about $25
to $30. A
GE ballast you buy should be wired in exactly the same way as a
Sylvania. They
are both Instant Start and the wire colors are the same. Just
mount it
on the second fixture side and duplicate the wiring.
Finish by wiring both of the ballasts
AC supply
wires together and remember to keep the ground wire attached.
When it
comes to AC power supply wires, don’t forget: black-HOT,
white-NEUTRAL,
green (usually)-GROUND. Always keep black wires together, white
wires
together, and green wires together, within the same wire nuts, do not
mix them.
From my searches, it would seem like
a good
idea to buy one of the many "adaptable" aka "universal"
electronic ballasts available and put it in a decent fixture. You could
then
run any number and type of bulb on a single ballast.
Many ballasts have circuitry to
prevent
feedback of some sort that prevents being able to connect more than one
ballast
to one bulb. On a forum on reefcentral's site, someone tried connecting
two
separate ballasts to a bulb, and fried the ballasts. So don’t use two
ballasts on one bulb!
Cheap fluorescent ballast/fixtures
Posted
by Zink on
Garden Web forum.
Being very comfortable with electronics, I played
around
extensively with the concept of "overdriving" fluorescent lights, by
a simple rewiring of the ballast wires. This can be done with a wide
range of
the newer electronic ballasts, but NOT the older, heavy
magnetic
ballasts. I have found that the better brands (Advance, Sylvania,
Magnatek,
Universal, GE) seem to work very well. While experimenting, I happened
upon the
least expensive and most versatile electronic ballast available. Even
without
using the concept of overdriving, which I will explain, these fixtures
are a
very good (and bright) deal.
The light is a Home Depot "Commercial
Electric" Shop Light, which uses an electronic ballast - a Sunpark
SL15.
The fixture sells for less than $10.00 at the local Home Depots.
Electronic
ballasts are designed to power the newer and more efficient T8 bulbs on
the
market, but can also operate the old standard T12 bulbs. (T12 = 12/8
inch
diameter, T8 = 8/8 inch diameter). Side by side, 32w T8 bulbs in an
electronic
ballast fixture are brighter that 40w T12 bulbs in a magnetic ballast
fixture.
That is just the start. Although I bought and played around with many
types of
electronic ballasts (32w, 59w, 110w, HO, etc) I ended up buying many of
the
Home Depot fixtures after finding out what I could power with them,
mainly by
"overdriving".
The Sunpark SL15 ballast (which
drives two
bulbs) has 2 red wires and 2 blue wires going to one side of the
fixture, with
1 blue, 1 red, and 1 yellow wire going to the other end of the fixture.
On the
first end, combine 1 blue wire to 1 red wire (either one), then the
other blue
to the other red wire. On the other end, combine the single red to the
single
blue wire. The yellow wire on one end will also be jumpered from one
socket to
the other. Just remove the jumper from the unused socket. Now, one
socket will
have a red/blue attached to each side of the socket. The other socket
will have
a red/blue and a yellow attached to it. You have "paralleled" the
ballast output and can now drive an incredible array of standard bulb
types:
48"-32w, 48"-40w, 36"-30w, most any 24" bulb. I actually
lit bulbs that would no longer light in a normal fixture. The extra
current
gooses them into working.
The coolest discovery of all, though,
was that
I could really light up some special bulbs I was interested in. The
power
compact twin-tubeT5 bulbs that come in 36,40,50 and 55 watts (and are
about
22" long) could also be lit. The 40w bulb was INCREDIBLY bright. In
this
case, one $6.50 ballast with one FT40w (also called PLL40, Dulux-L 40)
bulb was
WAY brighter than a normal 40w 2-bulb fixture. I also was able to light
up a 54w
T5 High Output to a blazing fury. Those 54w bulbs are recent, very
efficient
(lumens/watt) bulbs on the market. I built a fixture with 4 54wattT5HO
bulbs
and 4 Sunpark SL15 overdriven ballasts, which is as bright as a 250w
High
Pressure Sodium.
The other ballasts that I listed here
are not
the only ballasts that can be overdriven. These are just some of the
common
ones. If the ballasts are electronic and are wired the same as these
diagrams
show, then they are probably overdriveable.
Even though the
electronic ballast is powering the
lamps with a 22kHz or higher current, it is still being derived from
60Hz line
current. You may find an individual ballast that hums loud enough to
annoy you
This is disappointing to those of us expecting very silent
non-flickering
power. Some ballasts are "noise" defective. You might try to exchange
it, electronic ballasts are quiet, period! Any noise indicates it’s
defective.
So basically, all you need to do is buy 2
fixtures, remove the
Sunpark SL15 ballast from one and mount it in the other fixture. Each
fixture
uses a single ballast to operate 2- 48” lamps. Essentially, what I am
doing to
“overdrive” is to use that TWO-lamp ballast to drive only ONE lamp. I
am
removing the wires going to lamp #2, and pairing them up with the wires
going
to lamp #1. (There is really no designated #1 or #2 lamp in the
fixture. That
is just for the explanation.) That will “overdrive” one lamp to about
1.7 times
its normal output. You will now have 2-lamp fixture, which puts out
more light
than 3 lamps. Each bulb is being powered by it’s own 2-lamp (but
inexpensive)
ballast.
They are sold in a grey and white box
marked
Commercial Electric Shoplight. The part number is 140-904. They do NOT
say
anything about the ballast inside, and the Home Depot employees should
not be
expected to know that either. I did notice that above the UPC code on
the back
is HBSL-15, a reference to the Sunpark SL15 ballast. That is the only
indication I ever saw on the box. Our local Home Depots seem to have
had these
fixtures constantly in stock for at least 10 months. Oddly, in my
nearest HD
store, they currently have a pallet of these shoplights which has a
ballast
that looks the same, but without a label, and have only 2 wires (1 red
+ 1blue)
coming out of one end. That end of the lamp is wired slightly
different, and is
NOT the correct ballast to use. This incorrect ballast DOES have the
HBSL-15
written on it, but IS NOT the “overdriveable” ballast. The correct
ballast has
4 wires (2 red + 2 blue) out of one side, and 3 wires (1 red, 1 blue
and common
yellow) out of the other side. There also are the black (hot) and white
(neutral) which are the power wires coming into the ballast.
One more minor thing to be aware of:
I found that one pallet of fixtures one of the
Home Depot
stores got in had a slightly different ballast with only two wires
going to one
end instead of three. The ballast apparently worked on a slightly
different
principle and could NOT be overdriven. Return it if you get one of
these. After
purchasing the wrong fixture once, I decided to open the box in another
Home
Depot and look. They had a fresh shipment of the shoplights in and they
WERE
the correct ballast. What was going on with that one odd shipment, I do
not
know. I would open the box first and check for the Sunpark SL15 label
on the
ballast AND that there are two blue and two red wires coming from one
side of
the ballast.
Bulbs
T12 lamps are 1 1/2" in diameter and T8 lamps are
1" in diameter. Each number in the T# convention equals 1/8".
A T12 bulb (one and a half inch) won't appear
quite as
bright as a T8 (one inch) bulb because the same light output is being
distributed over a larger bulb area. But the overall luminosity will
still be
slightly higher.
A T8 and T12 bulb has the same pin
configuration, though, so you could use T8 bulbs in the same
sockets/strip
lights that T12 are used. If you have those rubberized endcaps that fit
around
the light tube, they have separate ones for T8 and T12 bulbs.
One relevant fact – The reason that
your
store-bought fixtures are not already overdriven is because of the
efficiencies
mandated by such things as the 1992 Energy Act, which requires
standards of
environmental impact and energy efficiency. The nice result of that
energy
legislation is that the 32wT8 lamps, with an electronic ballast, now
put out
more light, more efficiently, than 40wT12 fixtures used to. Overdriving
IS a
less efficient use of energy, but. will get you 70% more light per
bulb. For
the special case of the plant grower or fish tank enthusiast,
overdriving fluorescent bulbs is a
welcome application for their hobby.
If you want to use T12 GE Plant &
Aquarium
bulbs (I love 'em!) then go on and use them. They won't be as efficient
as T8
bulbs, meaning they'll need more watts to produce the same lumens, but
should
still produce about the same light. The ballast should just work
harder.
The intensity two (ODNO)F32T8 lights put
out is
amazing. More intense than a 55w Power Compact bulb, and far cheaper to
replace
bulbs. The bulbs get considerably warmer than normal, but not even as
hot as a
Power Compact bulb. A fan is useful to help extend bulb life, which
should be
approximately 1-2 years.
The 4x ODNO F32T8 bulb consumes only 80 watts, but
produces
6500 lumens. The standard convention of "watts per gallon" comes from
a 2000 lumen, 40-watt standard F40T12 bulb. This ODNO F32T8 bulb is far
more
efficient, so it produces as much light as 125 watts of standard
lighting (like
three 40 watt tubes).
The 4-F32T8 (electronic) ballast will
still
make that 40watt bulb glow like crazy. I haven't been able to find an
electronic ballast designed for four 40watt tubes, only magnetic (You
remembered not to overdrive with magnetic ballasts? Good!) Electronic
ballasts
are mostly used in industrial applications, because they're efficient
and
quiet, with low power consumption, and F32T8 bulbs are mostly used in
industrial apps because they are also more efficient as well as
smaller.
. The T8's will provide almost as
much
intensity with much less power consumption. The T12's will provide
slightly
more light, but will consume more power. Home Depot or Lowe's may not
have the
5000k T8 bulbs. Find a local lighting supply store in your Yellow Pages
if you
want the T8 bulbs, but I'd just go with the T12 bulbs if I were you.
I have definitely been curious to know the
temperature of
some of my lights. Fluorescent lamps do have a temperature curve for
optimum
brightness. I have always thought that most bulbs seem to burn a lot
hotter
than what is recommended. Since the cold weather set in, I noticed that
a
couple of compact fluorescents in my garage are a lot brighter than
they were
before. They still get warm, but definitely burn brighter.
One of the effects of overdriving fluorescents is
that the
bulbs do get hotter. I used my infrared pyrometer and measure the heat
from the
regular fluorescent bulbs and compared it with the heat coming off the
lights
of the overdriven fluorescents. The regular lights inflos-4 foot
T8's-were
100F, while the overdriven ones were burning at 120F. In spite of that,
the
light output is definitely increased. I originally found the
overdriving
technique in the fish/coral forums. Those folks like to overdrive by 4X
to
achieve maximum brilliance. I tried that, but they got too hot for my
taste.
Burning at 2x is more efficient.
I've been looking into T8's and T12's
recently
at the Phillips website and I found two bulbs that look promising:
T8 "Advantage… universal start
ultimate performance" 32watts, 4ft, 3000,3500,4100,and 5000K
availability,
3200/3040(initial/design lumens) CRI
of 86. 24,000hr life. From what I can tell, this
is the
highest output T8 I've seen that isn't a "High output" version.
T12 "Advantage..." 40watt 4ft.
3000,3500,4100,and 5000K, 3600/3250(initial/design lumens). 24,000hr
life.
Love them lumens!
I've found a light that looks
interesting.
These are 38 watt GE 2d lights. The bulbs are T5 compact fluorescent
and are 8
inches square. Ace Hardware has them in the form of the Cool Star 2D
Job Light
for sale for about $20. These lights are 38 watts, 3500 Kelvin and they
put out
2850 lumens. That's over 75 lumens per watt efficiency which is better
than
most compact fluorescents but not as good as T8's. Those Lights of
America 65
watt bulbs put out less than 62 lumens per what I believe, and they are
something like 6500 Kelvin, which is more, white and not as good for
flowering
as lights that are 2700 or 3500 Kelvin like the GE 2D lamps.
I bought one of these and took it
apart. The
ballasts are tiny and it would be really easy to remove one from the
bulky
fixture and mount just the thin lamp on a small shelf over a plant(s)
with a
homemade shiny reflector. The ballast could be hidden on the side or on
the
back of the shelving unit.
What's good about these is their
efficiency and
the amount of light that is concentrated into a small area. These put
out as
much light as a 4 foot 40-watt tube in an area of 8 inches squared. I
was
thinking these would be perfect for a 10 by 20 inch mini shelf garden
in my
daughter's room on a small bookshelf. They even have replacement lamps
in 2700
Kelvin for better flowering.
Growing
plants with overdriven bulbs
I have read and accumulated an extraordinary
amount of data
on lights and growing. I often see posts concerning their low lumen
count, but
keep in mind that lumens are a measurement for human eyes, not
plants. A
Gro-Lux bulb has a concentrated light frequency in the 450 nm range.
Therefore,
it's great for stimulating photosynthesis in plants. Overdriving the
seemingly
dim Gro-Lux Standard bulbs is rewarding. They aren’t dim anymore! I
recommend
Gro-Lux bulbs. I found out that the light that the bulbs put out is
almost
perfectly matched and balanced to the nanometer ranges that chlorophyll
requires. It just doesn't put out any of the rest of the visible
spectrum. I am
referring to the standard Gro-Lux, not the Wide-spectrum. Wide-spectrum
Gro-Lux
is not any better for plants - fish tanks, maybe yes.
I'm mostly using my lights on fish
tanks,
reptile cages, and a couple of seedling trays. (palms, passion flowers,
agaves,
etc..will also be using them for starting heirloom tomatoes, peppers,
artichokes, etc). In my opinion these overdriven ballasts are an
excellent
replacement for the "commercial security lights" many people are
currently using for their seedlings, like the 65w compact fluorescent
from
Lights of America. I have three (two on fish tanks, and one on a
seedling
tray), and I think my 2 foot overdriven setups are every bit as bright
and
effective (in fact maybe more effective, because I get a better spread
of
light) as those. As a bonus, the new setups only cost $11 each instead
of $30,
are a better quality than the LOA (I've had several die on me) and
apparently
use 54 watts instead of 65.
Most plants don't get enough light under ordinary
fluorescents. So I think your plants would be better off under the
brighter
light of overdriven fluorescents. You might want to do a search, on the
Internet and in bookstores, for the light requirements in foot-candles
of the
plants you intend to start under lights. Fortunately plants can do well
enough
to get to transplanting size under less light than they would require
for
sustained growth to maturity.
A big problem with seed starting is
that after
they have germinated and got their first true leaves they need a cooler
temperature than most houses are kept at. For stocky sturdy transplants
you
should grow them at 50 F to maybe 65 F tops. Growing them warmer makes
them
spindly. You might want to think how you can make it cooler for your
seedlings.
If you had a cool basement or some other room that didn't require human
habitation, you would probably be better off putting your fluorescent
plant
growing fixtures in there. Incidentally, seedlings develop stronger
stems if
they are exposed to some wind. Some people use a small electric fan to
provide
that "wind". I plan to put a small fan on a timer for our seedlings.
The most important thing to mention
is that I
put some houseplants under my overdriven lights, and they have taken
off like
I've never seen them do before
Aquarium use with overdriven bulbs
For those of
us who with
planted fish tanks, we have one of two options for lighting. We can
either use
the expensive commercial setups like metal halide or power compact
bulbs, or we
use a shoplight or two with from two to four 32 watt bulbs. Two
shoplights can
be had from Home Depot for under fifty dollars, but you won’t have much
room
for other stuff like heaters and filters. The shoplights are fine for
tanks
that are four feet long such as 55, 75 or even 90 gallons. Here’s
another
reason to overdrive two bulbs instead of buying into a normally driven
four-bulb setup. It has to do with light intensity. Which do you think
will
give more light, a 100watt incandescent light bulb or four 25watt
bulbs?
The light output theoretically should be the same, but you can see that
the
single 100watt bulb is much brighter. It works in a similar fashion by
overdriving two fluorescent bulbs as opposed to a normally driven
four-bulb
setup.
The bulb life
may not be
quite as long, but most aquarists replace their bulbs every six months
to a
year anyway, because their normally driven bulbs begin to lose their
light
output.The replacement life is not so critical for plants, but corals
are more
sensitive and you should be safe replacing coral-use bulbs every six
months.
Use
the
overdriving method to power bulbs of any size. If you have a smaller
tank, you
can do this with 18” or 24” bulbs. One 2-F32T8 ballast will replace
your old
ballast which only drives one 18 or 24 inch bulb, and give you more
light!
If you use
regular
fluorescent bulbs and not specific color bulbs, you may consider T8(one
inch
diameter) instead of the older T12s. T8 bulbs are designed to use less
electricity and put out more light, which sounds like a good deal to
me. One
overdriven T8 should put out about 6500 lumens.
If you have a glass cover, the
regular endcaps
will be fine. If they are exposed to the water surface, definitely go
for the
waterproof endcaps. Just go with new endcaps with screw mount bases
(not the
notched ones that slide onto a PC board or metal reflector).
I had an empty 75G tank and two 4-foot strip
lights, the
thought of spending $300 for a good PowerCompact fluorescent tube setup
was
very unappealing to me. So I was off to the lighting supply store. I
purchased
2 Damar electronic ballasts-Item No 3093A, these are for 4 lamps with
wattage
of 12, 25, or 32 watt T8 lamps. I took the two strip lights from my
tank, and
removed the old magnetic 1-lamp ballasts and old T12 lamps. I also
removed all
of the old end caps and wiring. It was then a simple matter to push the
four
leads (two blue and two red) from the new ballast into the four slots
of the
new end caps. At the other end of the strip light I pushed the two
yellow leads
into the end cap slots. Connecting the power leads only required
twisting off
the wire nuts and wiring in the new power leads. Start to finish was
less than
20 minutes.
Not being extremely confident of my
electrical
skills I closed my eyes when I plugged the "new" strip light into the
power outlet. This was a good idea...the light is simply blinding. I
was truly
amazed. I took my 55W PC's and laid them beside the "new" strip
light, certainly to the eye the T8 light is quite a bit brighter. In
fact, it
is not possible to look directly into the T8 lamp with a mirror
reflector.
Here's what I spent for what is likely equal to at least 200W of NO
(normal
output) T12 lighting. You could use the old T12 bulbs until they burn
out, if
you want. Then buy the more efficient T8 bulbs.
2- 4-foot
strip lights I
already had. $0.00
2- Damar Electronic
Ballasts (4 lamps
T $19.54 each.
2 sets of end caps $2.94
each.
2 F32T8 6500K lamps $3.65
each
For less than $60.00 I almost tripled
my
lighting. For me this was simply a test to prove to myself that this
works. It
does. Now I'll build a new DIY wooden hood to house a mirror reflector
and
three overdriven T8 lamps. This should give me lighting equal to
approx. 300W
of NO T12 lighting, and it should cost about $100 total for the wood,
ballasts,
end caps, and bulbs.
Measurements have shown that a F32T8
lamp
configured just as I just did generally puts out approximately 6500
lumens.
Most 55w PC's put out between 4000-5000 lumens. CSL's BriteLite 65w
PC's put
out 5500 lumens.
OverDrivenNormalOutput
lights can definitely be intense. I generally consider them roughly
just as
bright as 55w PC's, but the nicest thing is the bulb replacement cost.
$3.65
instead of $18-$30 per bulb. And bulb life is only slightly less.
A 120vac fan is all you'd need to
keep them
cool and the bulbs will live longer as well.
Get a four-bulb ballast even if
you're not sure
about driving the bulb 4x or even 3x. You can overdrive just about any
fluorescent tube, but some are more effective than others. Modern
electronic
ballast are load sensing - so if you buy a 4F32T8 ballast, it can run
just
about ANY bulb. The ballast adjusts and limits current automatically.
You can
at least drive two bulbs 2x apiece. It's not REALLY four times, because
the
ballast and bulb become less efficient, the more current you drive
through it.
Overdriving two 18" fluorescent bulbs won't bring them to 60watts each, but rather
approximately 60 watts total.
If you wanted to overdrive your two
36" 30
watt bulbs, you could. Several guys on reef central have done it. I'd
recommend
one 4F32T8
ballast per bulb. With all four outputs driving
each bulb,
I'd estimate the output would approximately double (60watts each).
You might be able to try and find an
electronic
ballast for six-foot bulbs (F96T8) but they're a lot more expensive.
But you
could wire both 36"
bulbs in series and only need one ballast. They're
definitely going to be hard to find, though.
On reef central as well as a few
Canadian reef
boards (apparently, intense lighting fixtures are very expensive in
Canada)
there are dozens,
maybe even hundreds of hobbyists who have used
this method
without a single report of fire or severe hazard. The worst I've heard
is a few
burned out ballasts from incorrect wiring. I
certainly
haven't heard about any bulbs exploding.
Fluorescent bulbs were designed to
carry more
current than they usually see. Not only do they have a certain factor
of safety
built in, but most
ballasts are energy saving at 88% delivered
current. When
you actually deliver 2x that amount, it is still not far beyond the
bulbs
standard
output, and definitely not over capacity.
For a planted tank - you can consider
each
F32T8 bulb to be the equivalent of 125 watts (overdriven with a four
bulb
ballast per bulb) - enough to grow most plants in a 55gallon tank. Two
of these
bulbs (again, each with their own ballast) would be enough light on
even a 75
gallon to grow intense light plants.
The reason they mention four ballasts on the reef
site post
is because they are actually driving four separate bulbs, each with
their own
4-F32T8 ballast. That's a LOT of light, but that's what SPS corals
need. If
each F32T8 bulb being driven by its own 4-F32T8 ballast (with all four
outputs
connected to the one bulb) makes 6500 lumens, we're talking 26,000
lumens here!
In the standard watts per gallon convention - this translates to well
over 500
watts of light! The electricity cost is not cheap to run a setup like
this, but
what the hey.
One person calculated the cost of
running a
four lamp setup and said “It's actually pretty amazing at how much
electricity
a Planted Tank or Reef Tank can consume. A set of four ODNO bulbs will
draw
roughly 6.7A. Pretty significant! At anywhere between 10 cents and 13
cents per
kilowatt/hour, that's $1.00-$1.20 a day for a 12 hour photoperiod!”
Questions
Q.I only want to have about 160-170 Watts for a
two-foot
deep tank. Should I OD each bulb with it’s own ballast (4x)? Or should
I just
use one 4F32T8 ballast to overdrive both of the bulbs (2x)?
- You could always start with a single
4F32T8 ballast and 2X OD each bulb and buy an additional ballast in the
future if you find it isn't bright enough. If you're targeting around
160 watts of light, you better go with the two 4F32T8 ballasts. Better
yet, for the same price as a 4F32T8 ballast, get a Fulham Workhorse 5
ballast. You can find them at local lighting distributors but Pet
Supply Liquidators has them here for $25 apiece: get the 128w
WH5-120-Long Case ballast.
Q. Can you use overdrive setup with the F32T8
ballast with
T12 bulbs?
A. Yes, I'm using this setup right now on my tank.
I have a
4F32T8 ballast 2X OD'ing a pair of Sylvania Gro-Lux F40T12 tubes. It's
definitely
brighter than it was with the original magnetic ballast, but not twice
as
bright. OD'ing 4x would definitely achieve that. Anyway, the reason I
go with
the less-efficient F40 tubes is because Sylvania makes them in the
Gro-Lux
phosphors. The light output in these bulbs that are beneficial to
plants and is
stunning.
Q. If you have the kind of sockets which are
already
internally shorted, you must connect your pair of wires together at the
socket.
My Question: Does this mean they go in the same hole on one side of the
socket?
A. No, not necessarily. There
probably will be
2 push-in slots at that spot. That is to say, two holes for each tube
pin and
each pair are for the shorted lamp pins. Put one wire into each slot
and thus
avoid having to tie them together first and pushing into one slot.
There will
be a total of 4 holes per socket (two slots for each pin).
Q. I currently have one 2 light 48"
fixture, and was planning on getting another when I ran into this
thread.
Wouldn't I be better off to run the four lights as they are than 2
extra bright
ones???
A.Yes, you will get more light using 4 bulbs in
normal
fixtures than using 2 bulbs in overdriven fixtures. The idea of
overdriving fluorescent lights is to
maximize the light per fixture, usually because of limited space or
“high-light” loving plants. Or just because it’s so cool once you see
it.
Q. I double-checked all my wiring and
still my
overdriven lights don’t work right. What went wrong?
A. Basically, if the fixture I am
messing with
doesn’t light, I check my wiring first and then jiggle the connections.
That
usually works.
If you want information about what others are
doing with
overdriving fluorescents, try these forums. I copied some of the
postings from
a few of them to write this article.
http://www.plantedtank.net/forums/
http://www.gardenweb.com/
http://forums.gardenweb.com/forums/lights/


 If you
don’t want to monkey around with getting the
wires in and out of the sockets you can use solderless tap connectors -
the
ones I know of are called Scotchloks. Home Depot and Radio Shack should
have
them; just make sure you get the right ones for your wire size. These
let you
tap into a wire without cutting it - for example you could cut off the
red
wires in the middle, then lay the blue wire in the Scotchlok, lay the
end of
the red wire in it, fold over the top and press it together carefully
with
pliers.
If you
don’t want to monkey around with getting the
wires in and out of the sockets you can use solderless tap connectors -
the
ones I know of are called Scotchloks. Home Depot and Radio Shack should
have
them; just make sure you get the right ones for your wire size. These
let you
tap into a wire without cutting it - for example you could cut off the
red
wires in the middle, then lay the blue wire in the Scotchlok, lay the
end of
the red wire in it, fold over the top and press it together carefully
with
pliers.