Introduction to Nautical Knots
Terminology (Start Here)
Reef Knot (Square Knot)
Sheet Bend (Becket)
Two Half Hitches
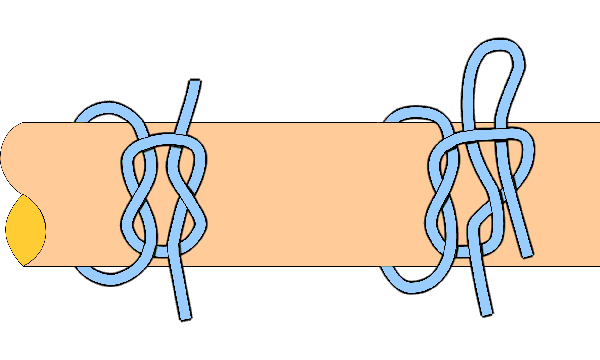
Fisherman's Knot
Fisherman's Eye
Flemish (Figure Eight Eye Knot)
Making Fast to a Cleat or Pin
TERMINOLOGY ![]() top
top
Almost everything on a sail boat has a nautical name and is done in a nautical way. We don't tie knots on boats, we throw them. "Throw a bowline on the jib halyard" has a nautical meaning that is very specific.
On a sail boat nearly every length of rope is dedicated to some specific use. Ropes that are so reserved are called lines and usually have a special name. For example; the jib sheet is a line that goes to the clew of the jib sail, the main sheet is a line that goes to the clew of the main sail or end of the boom, the jib halyard is a line used to raise the jib sail. There are lots of lines on sailboats.
Remember, lines are ropes that are being used and old salts will scowl at you when you call a line a rope. Even lines that have no specific use aren't called rope. If a line isn't being used it is wrapped up and called a coil. The only rope that I know of on a sail boat is the bolt rope. And of course in the teaching of knots the lengths of rope that we use to practice on are called rope not line - since they have no dedicated use on the boat.
However, when you are on a sail boat and throw a knot you will be doing so for some reason. You will tie a bowline on the stay sail halyard to fasten it to the head of the sail for hoisting. So when you are not practicing on a rope you are working on a line.
In order to talk about throwing knots we need to learn some terms to describe parts of the line we are working on.

Usually we will be working at or near one end of a line. That's the working end. A bight is a bit of slack we take out of the line so we can start working with it.

Many knots start out by forming a loop. There are two basic types of loops. The underhand loop has the working end pass under the standing part. The overhand loop has the working end pass over the top of the standing part as shown.
Turns. Once around is once around, all the way around one time.

Hitches, Bends, Shanks
Hitches fasten a line to a rail or eye.
Bends fasten lines to other lines or wires.
Shanks are knots that shorten a line.
FIGURE EIGHT
![]() top
top
The figure eight knot is tied at the end of a line (such as the jib sheet) to prevent it from going through a block when it is running free.
FISHERMAN'S BEND
![]() top
top

Good knot to fasten a line to an anchor or an eye.
FLEMISH (FIGURE EIGHT EYE
KNOT) ![]() top
top

This loop will not slip very easily and is simple to tie; but if it gets too tight it will be difficult to undo. It can be quickly tied in the middle of a long line without access to the ends.
REEF KNOT (SQUARE KNOT)
![]() top
top

The reef knot or square knot is used to "reef" the mainsail and to secure things. The slipped reef knot on the right is used when unreefing needs to happen quickly or for convenience.
CLOVE
HITCH ![]() top
top

The Clove Hitch is used for fastening a line to a rail or post. Fenders are often secured to the railing with a clove hitch.
SHEET BEND
(BECKET) ![]() top
top

The sheet bend or single becket is used to attach two lines together. It is especially good to use if the two lines are not the same gauge (diameter).
DOUBLE
BECKET ![]() top
top

Like a sheet bend it is used to attach two lines but the wrapping around the other line is doubled. This gives even more insurance against slippage. Use this bend anytime but it is especially good to use when the two lines are substantially different gauge. Double Becket the smaller diameter line around the larger one.
BOWLINE ![]() top
top
The bowline is one of the top three knots to know. It isn't very difficult and there are several ways to make it, including an easy way to get it wrong. It is used to make a loop at the end of a line that won't slip. It is used to tie the ends of sails to sheets and halyards. It is also a good rescue knot. Tie a bowline with a loop large enough to slip over a person's shoulders and hoist them back into the boat.
Start by taking a bight near the end of a rope then make an overhand loop:

next draw the end of the rope through the underside of the loop and away from you:

Finally go around the standing part in the same direction as the overhand loop is coiled and then down through the loop:

and there you have it.
Now here's how it can go wrong and create a false bowline. If you come up through the overhand loop and go toward you, or opposite the lay of the overhand loop:

Then down through the loop:

You get the false bowline! The problem with the false bowline is that the end is on the outside of the loop and it is easer for it to slip. Now look at the proper bowline again:

and note how the end will be constricted and held tightly as tension is brought on the loop.