

6 cam video switcher made from a Radio Shack 6 position, 2 pole rotary
switch (part # 275-1386A, $1.99), a hexagional control knob (# 274-415A,
$1.99 for 4), octal phono jack board (# 274-370, $2.29), wood, hot glue,
wire, and solder. Add another phono jack board to also switch 6 audio
sources if the cam has a mic included. The bottom pix is the test setup.
SWITCH: The switch needs to be modified to remove the "click" mechanism,
which is hard on the servo. Look closely at the switch and you will see
a small BB held in place by a piece of spring metal. Lift the spring metal
up and pop out the BB. Then carefully work on bending the spring metal up
until it does not contact or catch on the bumps, and the switch turns
smoothly. Remove the shaft nut and washers, as they won't be needed.
I attached the video wires to the bottom 6 tabs, as the upper 6 would be
easier to get to later if audio switching is needed.
WOOD: I used a ~2.25" X 12" strip of ~3/8" cheap ply type wood. Cut off 3
1.5" pieces from the end. Two of these are used as spacers under the servo
to keep the control horn from hitting the base when it rotates. The other
is used to mount the switch. To find where to drill the switch hole, mount
the servo with spacers on the base. With the servo control horn removed,
position the switch wood against the servo spline (a little dab of butter,
etc., on the spline tip will mark the spot). This is the spot to drill a
3/8" hole for the switch. You will need to also make a small slot in the
wood for the switch alignment tab. Mark the spot and tap the slot in the
wood using a small screwdriver.
SWITCH KNOB: The silver disk on the switch knob is only glued on, so pry or
pop it off (it will now have a hole all the way through). Carefully align
the wide side of the knob with the control horn and glue together. Back the
knob set screw out and mount the control horn on the servo spline. Then
insert the switch shaft and align. Then tighten set screw. The rest you can
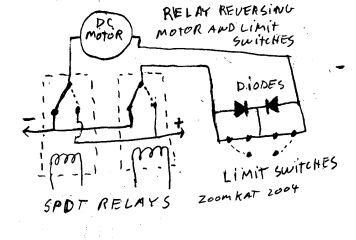
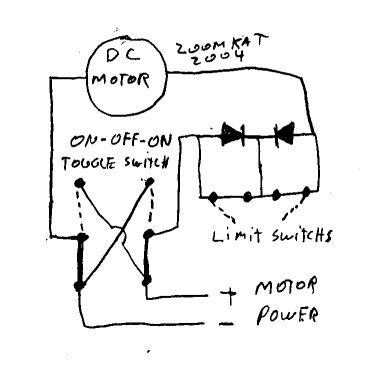
probably guess from the pix. For motor reversing switch and limit switch setup, see bottom pixs.


