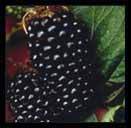
Blackberries are wonderful healthy fruits. I enjoy making muffins, cobblers, breads, jams and jellies from these sweet berries. One day, I plan to make ice cream.
This is my favorite jelly recipe handed down from the elders of the mountains.
Note: Wear elbow length tough gardening gloves and long pants if you are a beginner. Also douse yourself with insect repellent, as little chiggers love to crawl under your skin in the most embarassing places. They do itch, too. Get out in the cool of the evening, and pick all of the plumpest blackest berries you can find. Watch those thorns (this is where the gloves and long pants are useful). Take a long stick with you to bend the highest branches to within reach and also to part the bushes so you can get to the inside berries. All of the good berries seem to be hidden on the inside of the bushes. When you've gotten your 6 cups of berries, wash them thoroughly in cold running water. I usually just dump mine in the kitchen sink and run water over them. Pick through the berries making sure there are no little bugs stuck to them..just pull them off and discard. Pull stems and leaves and discard soft berries. After this is done (and this is the EASY part believe me), you will be so tired of looking at them, you'll begin to think you made a mistake. Just go ahead and store them covered in the fridge until the next morning.
Put berries in a very large pot and just cover with cold water.
Boil for approximately 1 to 1 and 1/2 hours. You should now have a wonderfully purple colored water. Strain berries through a seive or cheesecloth into a separate large pot. Discard strained berries. For those ambitious ones, there is a blackberry masher on the market. For every 6 cups of juice, add 6 cups of white sugar.(or if you get 12 cups juice, add 12 cups of water...keep ratio the same for the number of cups of juice you get.) Boil this mixture until you can no longer stir the foam down. Then boil for about 7 minutes longer. Test on a spoon for jell. It's ready when it adheres to the spoon. Pour hot jell into clean canning jars, wipe the rim with a damp cloth, seal with lid and turn upside down immediately on clean folded towels until cool.
Turn upright. When you do this and touch the center of the lid, the center should depress and stay there. If it doesn't, better eat this jelly right away. Put these in fridge. Store the others in a cool dark cabinet away from the heat. Even though your jelly isn't firm, it will firm up in the fridge.
My fondest memory is my first year of making jelly. A friend came over to the house for moral support (with the bribe of buckets of free berries). As soon as I had canned all the jelly, we sat down at the kitchen table with the pot, a spoon and hot bisquits. Let me tell you, this is the BEST part of jelly making. Spooning out warm jelly from the pot and smearing it over the hot bisquit. Heaven at its best.
By the way, I never "cook" my jelly in a canner after it's canned. No mold has ever grown and no one has gotten sick. I store my jelly for up to a year with no adverse results. As the elders say, "They've cooked enough".
You can cook these the same way, however, they are smaller, so you need more. Now the trick of blueberries is to make it back to the house with enough to cook. We usually never make it past the bushes. They're eaten right away.
 Geocities